Add devices to an Azure Group using the Microsoft Graph API
The Script
- GroupMember.ReadWrite.All
- Group.ReadWrite.All
- Directory.ReadWrite.All
You will also need the Group ID and Tenant ID, to find this following these steps
- Login to the Azure AD console (You can get your Tenant ID from the Overview tab under Tenant Information)
- Select Groups
- Search for the group you want to utilise and open it
- From the Group overview page copy the Object ID as this is the Group ID we need.
If your not sure how to create an Azure AD App Registration head over to one of my other posts by clicking HERE, Don’t forget to store your Client ID and Secret securely and also have it to hand for the rest of the post :D.
Executing the Script
There are numerous ways you can execute this script, you could use it as a script in Script in MEMCM or Intune, In a Task Sequence, as an Application or Package (You will need to add some for of check file for the detection rule) or you could execute this directly from the command line.
I will demonstrate the Script in MEMCM and Intune for you.
Script in MEMCM
This is the best option if you want to do it manually on a case by case basis (i.e. Right click on the computer object and select run script).
Jump into the Script section in MEMCM (Software Library > Scripts) and click Create Script from the ribbon.
Give the script a Name, select the language as PowerShell and then copy and paste the script above (Tip: In the top right corner of the script block you can click Copy Script Text).
Click Next, This is where you need the details we noted earlier. MEMCM is great at pulling through the Param block parameters, all we need to do is amend the ClientID, ClientSecret and TenantId arguments as below.
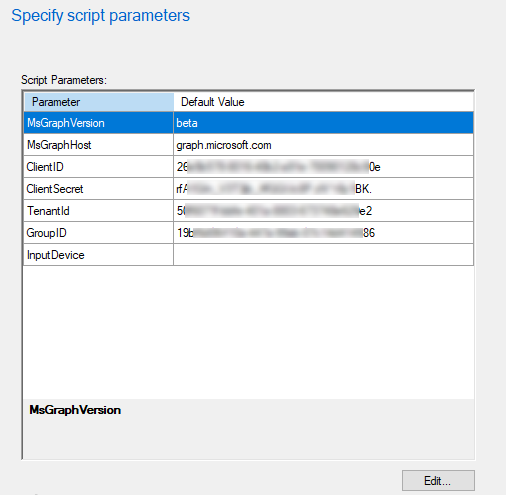
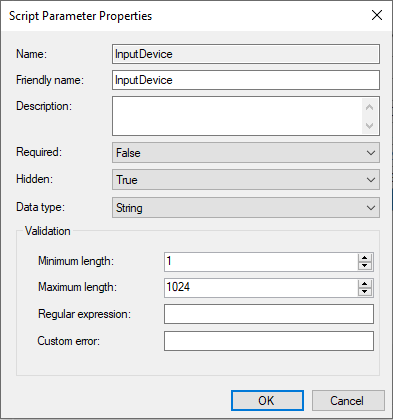
As we are using the environment variable for the InputDevice we will need to Hide this from selection as the script will use the Environment Variable if the parameter is not used.
Double Click on InputDevice, Change the Hidden drop down to True click OK.
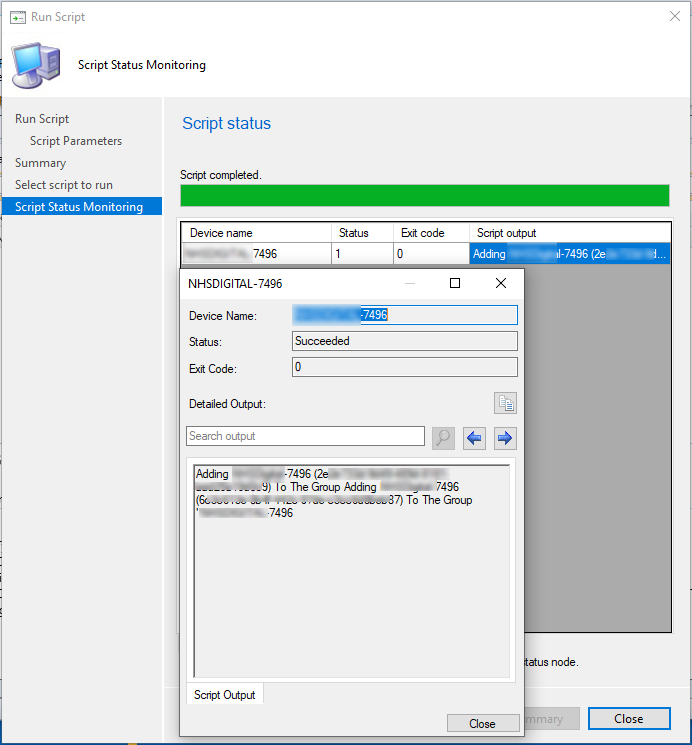
As mentioned before as these devices are Hybrid Joined they have two entries in Azure AD which is why the output shows its adding the device twice with two different GUIDS.
Script in Intune
This time the script needs to be saved as a .ps1 file to be uploaded and used by Intune, unfortunately using the Scripts section in Intune you cannot specify parameters so you will need to put your Client ID, Secret, TenantID and Group ID into the script before uploading. You could use a Win32 App as an alternative method if you wish to use them via the command line. Once you’ve saved the script launch the Endpoint Manager Console from your favourite web browser.
Select Devices from the left hand pane, under the Policy section click Scripts.
Click Add > Windows 10, Name your script appropriately and enter a short description (Even a link to this blog :P), Once you’ve done hit next and then select your script to use.
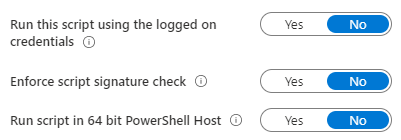
Leave all of the sliders as No;
Click Next, Add your Scope Tags (if any) and your assignments. Review the configuration and click Add.
This doesn’t run instantaneously, please refer to the Microsoft Documentation this also has some other notable consideration listed.
To Conclude
hese are just two of the ways you can run the script, you could also potentially run this in the back end of a web application for people who want to request to disable things like Windows Hello (As I mentioned at the start). I could spent days, weeks even months on writing articles for some of the uses. A user one will no doubt follow in due course so watch this space :D.
I did fully test these methods at the time of writing the blog but if you come across any information you think may be wrong then please leave a comment.
I hope this is useful for your needs.
Categories
Tags
Add devices to an Azure Group using the Microsoft Graph API
The Script
- GroupMember.ReadWrite.All
- Group.ReadWrite.All
- Directory.ReadWrite.All
You will also need the Group ID and Tenant ID, to find this following these steps
- Login to the Azure AD console (You can get your Tenant ID from the Overview tab under Tenant Information)
- Select Groups
- Search for the group you want to utilise and open it
- From the Group overview page copy the Object ID as this is the Group ID we need.
If your not sure how to create an Azure AD App Registration head over to one of my other posts by clicking HERE, Don’t forget to store your Client ID and Secret securely and also have it to hand for the rest of the post :D.
Executing the Script
There are numerous ways you can execute this script, you could use it as a script in Script in MEMCM or Intune, In a Task Sequence, as an Application or Package (You will need to add some for of check file for the detection rule) or you could execute this directly from the command line.
I will demonstrate the Script in MEMCM and Intune for you.
Script in MEMCM
This is the best option if you want to do it manually on a case by case basis (i.e. Right click on the computer object and select run script).
Jump into the Script section in MEMCM (Software Library > Scripts) and click Create Script from the ribbon.
Give the script a Name, select the language as PowerShell and then copy and paste the script above (Tip: In the top right corner of the script block you can click Copy Script Text).
Click Next, This is where you need the details we noted earlier. MEMCM is great at pulling through the Param block parameters, all we need to do is amend the ClientID, ClientSecret and TenantId arguments as below.

As we are using the environment variable for the InputDevice we will need to Hide this from selection as the script will use the Environment Variable if the parameter is not used.
Double Click on InputDevice, Change the Hidden drop down to True click OK.


As mentioned before as these devices are Hybrid Joined they have two entries in Azure AD which is why the output shows its adding the device twice with two different GUIDS.
Script in Intune
This time the script needs to be saved as a .ps1 file to be uploaded and used by Intune, unfortunately using the Scripts section in Intune you cannot specify parameters so you will need to put your Client ID, Secret, TenantID and Group ID into the script before uploading. You could use a Win32 App as an alternative method if you wish to use them via the command line. Once you’ve saved the script launch the Endpoint Manager Console from your favourite web browser.
Select Devices from the left hand pane, under the Policy section click Scripts.
Click Add > Windows 10, Name your script appropriately and enter a short description (Even a link to this blog :P), Once you’ve done hit next and then select your script to use.
Leave all of the sliders as No;

Click Next, Add your Scope Tags (if any) and your assignments. Review the configuration and click Add.
This doesn’t run instantaneously, please refer to the Microsoft Documentation this also has some other notable consideration listed.
To Conclude
hese are just two of the ways you can run the script, you could also potentially run this in the back end of a web application for people who want to request to disable things like Windows Hello (As I mentioned at the start). I could spent days, weeks even months on writing articles for some of the uses. A user one will no doubt follow in due course so watch this space :D.
I did fully test these methods at the time of writing the blog but if you come across any information you think may be wrong then please leave a comment.
I hope this is useful for your needs.


