Enrol Devices to Autopilot (Unattended)
I have been working on a project at the company I work for, and up to this point we have been primarily focused on getting new devices imported and deploying via Autopilot.
Now we have successfully leaped over that hurdle with very little issues (apart from the odd TPM attestation issue here and there and the ESP Profile page been skipped), we moved onto focusing on our current estate and how to import these into Autopilot .
There is a couple of ways to do this, you could run this in a package, as an application, as a script or in a task sequence for when you decide to re-build the machines.
Now the choice is yours on which method will suit your organization the best.
The Script
Get it on GitHub
Now, lets talk about the script itself. When I started out on this path I used Michael Niehaus’ Get-WindowsAutoPilotInfo script, even before this had the -online parameter. I was also hoping to leverage the same script for importing devices into Autopilot silently.
There was however a couple of stumbling blocks for me not doing so, the first been the Connect-MSGraph would not connect using the ClientID and Secret from the Azure App Registration and kept prompting for credentials. The second being it downloaded other PowerShell Modules. This was an issue for us as firstly it added a further time delay to the script and secondly one of our security product blocked it during this process.
I had also recently started leveraging the Microsoft Graph API and decided to find a way to do this without additional the modules while achieving the same outcome. And the following is the outcome.
I have recently updated the script (28/08/2020) to include the use of Group Tags, but also to add the -Hash parameter. The hash parameter allows you to use any device has to register it with your tenant, for example if you had a folder with a set of .csv files containing the device hash’s you could do a recursive import of all of these.
If you want to export a device hash to a CSV file to test this use the following command which will create the CSV.
You can either copy and paste the hash or import the CSV into PowerShell and reference it that way.
Copy to Clipboard
The Pre-Reqs
To make the script work you will need an Azure App Registration with the DeviceManagementServiceConfig.ReadWrite.All Application permission for the Microsoft Graph API.
If your not sure how to create an Azure AD App Registration head over to one of my other posts by clicking HERE, Don’t forget to store your Client ID and Secret securely and also have it to hand for the rest of the post :D.
Executing the Script
As mentioned before there are numerous ways you can run this script, however I will demonstrate 2 different ways to do so, I will just mention though that if you do use this as an Application you will need to amend the script to add some form of check file or registry key.
Script in MEMCM
This is the best option if you want to do it manually on a case by case basis (i.e. Right click on the computer object and select run script).
Jump into the Script section in MEMCM (Software Library > Scripts) and click Create Script from the ribbon.
Give the script a Name, select the language as PowerShell and then copy and paste the script above (Tip: In the top right corner of the script block you can click Copy Script Text).
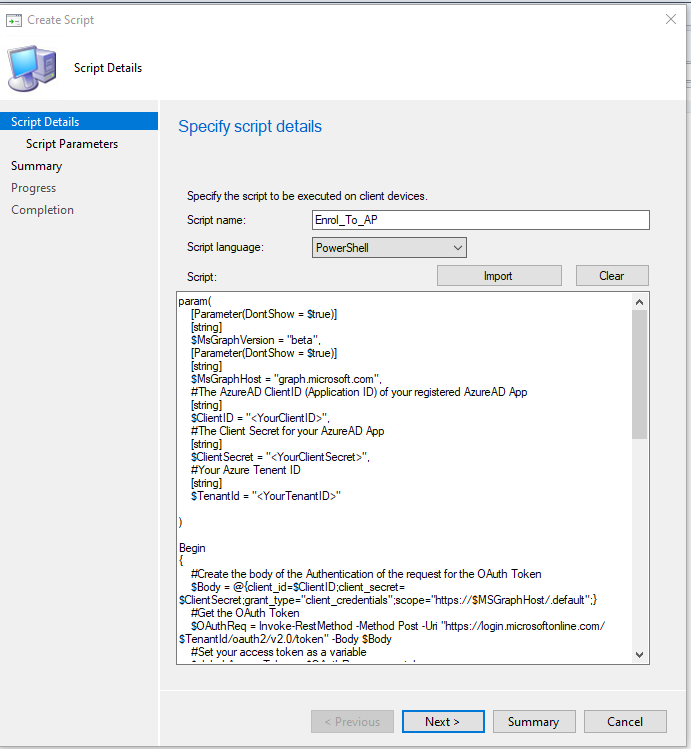
Click Next, This is where you need the details we noted earlier. MEMCM is great at pulling through the Param block parameters, all we need to do is amend the ClientID, ClientSecret and TenantId arguments as below. When finished click Next review the settings and then click next and then close.
Note
Don’t forget to Approve your Script.
Now choose your victim… erm I mean client computer from Assets and Compliance > Devices. Right click on the object and select Run Script, Select the script object you created and review the details and then let the script run :D. This can take about 2/5 minutes, as it keeps a loop going until the device is imported. When the script finishes if you look at the script out put you will see the following;
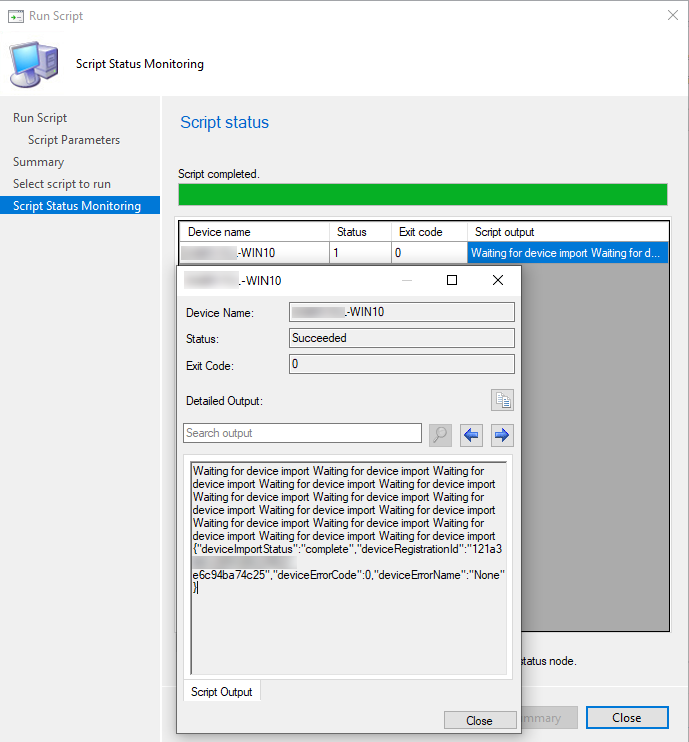
If you notice the last output shows the import status of the device.
In a Task Sequence in MEMCM
I wont go into how to create the entire Task Sequence for a device rebuild however I will explain how you can use the script to import the device into Autopilot during a Task Sequence weather it be a new one or a current one.
Head over to Software Library > Operating System > Task Sequences so we can get started.
I will be using a current Task Sequence for this Demo. There may be a future post on how to create a Task Sequence to re-build your device to a standard OS with Drivers and Import it to Autopilot.
My existing Task Sequence looks like this;
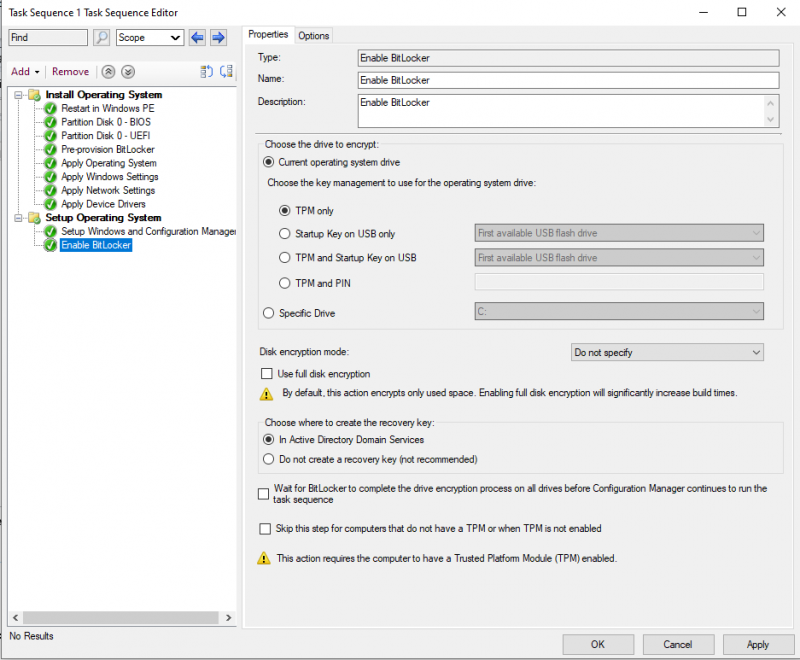
This is a very basic TS which just boots to Win PE, Installs windows and loads driver packs for VMware Virtual Machines (Only a test TS).
I no longer want to have to re-build the device and then import it to Autopilot Manually so instead we add the script to the top of the TS as follows.
- Click Add > General > Run Powershell Script
- Enter a Name and Description for the script
- Select Enter a PowerShell Script
- Click Add Script
- Copy the Script above and paste it into the window and click OK
- In the Parameters box enter
- -ClientID “” -ClientSecret “” -TenantId “”
- Select Bypass under the PowerShell Execution Policy drop-down
Your window should then look like this;
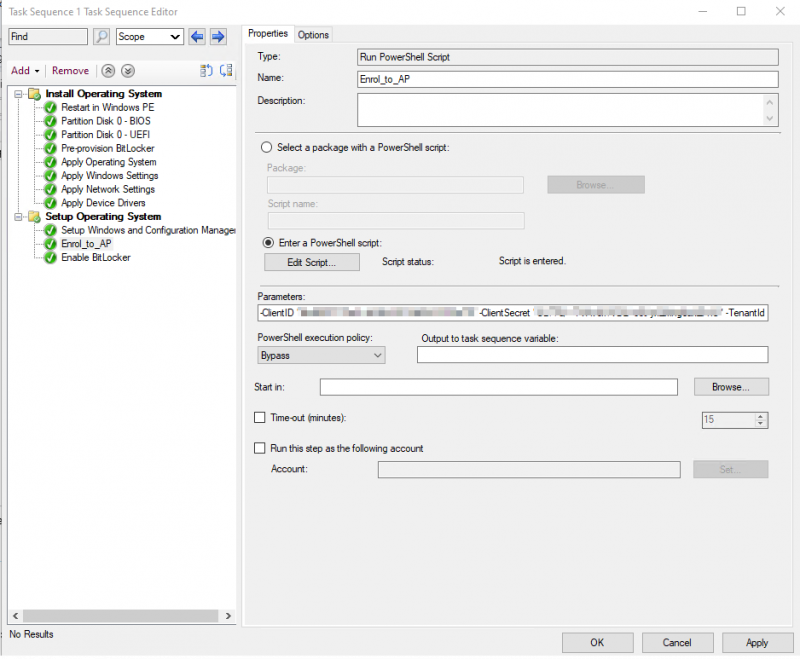
Hit Apply and then OK and give it a whirl on your machine (well not yours… always be sure to test it first :P)
When it runs you will see the following appear (depending on your Task Sequence);

The device will then be enrolled into Autopilot;
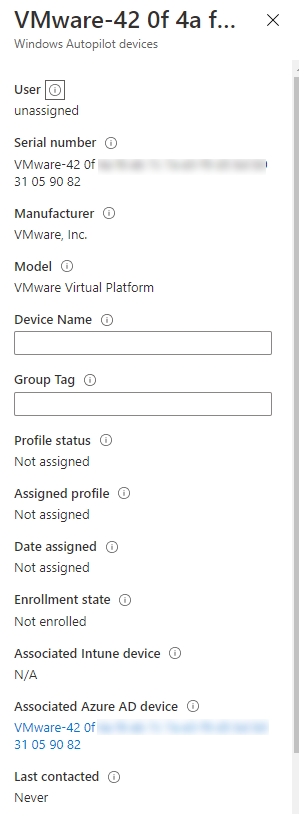
When the device then reboots after my task sequence I am presented with the expected Autopilot Enrolment window.
To Conclude
So I have shown two ways of using the script to enroll to Autopilot Unattended, now there is nothing preventing you running this from the command line with the same parameters however if you wanted to do it that way I would definitely look at Michael Niehaus’ Get-WindowsAutopilotInfo script (See the opening few paragraphs with the links to these) as this does not require an App Registration.
I did fully test these methods at the time of writing the blog but if you come across any information you think may be wrong then please leave a comment
I hope this is useful for your needs.
Categories
Analytics
App Deployment
Apple
Application Deployment
Azure
Azure Image Builder
Azure Resource Manager
Bicep
Compliance
ConfigMGR
DevOps
Endpoint Security
Entra ID
Graph API
Infrastructure as Code
Intune
KQL
Microsoft 365
Microsoft Fabric
Policy Configuration
Power Platform
PowerShell
Samsung
Tools
VLOG
Windows
Windows 365
WinGet
WUfB
YAML
Tags
ABM
App Registrations
ARM
ASR
Attack Surface
Autopatch
Autopilot
Azure
Azure Policy
Bicep
Clou
Cloud PC
Compliance
Conditional Access
CSP
Driver and Firmware
Enterprise Applications
Entra ID Connect
Features
Graph API
Group Policy
Hybrid
Hyper-V
Identity
Intune Policy
KME
Knox
Lab
Log Analytics
Mobile Devices
OMA-URI
Power BI
PowerShell
Security
Server
SSPR
Storage Accounts
Teams
User Experience
Virtualisation
Win32
Windows Updates
WinGet
WSL
WUfB
Enrol Devices to Autopilot (Unattended)
I have been working on a project at the company I work for, and up to this point we have been primarily focused on getting new devices imported and deploying via Autopilot.
Now we have successfully leaped over that hurdle with very little issues (apart from the odd TPM attestation issue here and there and the ESP Profile page been skipped), we moved onto focusing on our current estate and how to import these into Autopilot .
There is a couple of ways to do this, you could run this in a package, as an application, as a script or in a task sequence for when you decide to re-build the machines.
Now the choice is yours on which method will suit your organization the best.
The Script
Get it on GitHub
Now, lets talk about the script itself. When I started out on this path I used Michael Niehaus’ Get-WindowsAutoPilotInfo script, even before this had the -online parameter. I was also hoping to leverage the same script for importing devices into Autopilot silently.
There was however a couple of stumbling blocks for me not doing so, the first been the Connect-MSGraph would not connect using the ClientID and Secret from the Azure App Registration and kept prompting for credentials. The second being it downloaded other PowerShell Modules. This was an issue for us as firstly it added a further time delay to the script and secondly one of our security product blocked it during this process.
I had also recently started leveraging the Microsoft Graph API and decided to find a way to do this without additional the modules while achieving the same outcome. And the following is the outcome.
I have recently updated the script (28/08/2020) to include the use of Group Tags, but also to add the -Hash parameter. The hash parameter allows you to use any device has to register it with your tenant, for example if you had a folder with a set of .csv files containing the device hash’s you could do a recursive import of all of these.
If you want to export a device hash to a CSV file to test this use the following command which will create the CSV.
You can either copy and paste the hash or import the CSV into PowerShell and reference it that way.
Copy to Clipboard
The Pre-Reqs
To make the script work you will need an Azure App Registration with the DeviceManagementServiceConfig.ReadWrite.All Application permission for the Microsoft Graph API.
If your not sure how to create an Azure AD App Registration head over to one of my other posts by clicking HERE, Don’t forget to store your Client ID and Secret securely and also have it to hand for the rest of the post :D.
Executing the Script
As mentioned before there are numerous ways you can run this script, however I will demonstrate 2 different ways to do so, I will just mention though that if you do use this as an Application you will need to amend the script to add some form of check file or registry key.
Script in MEMCM
This is the best option if you want to do it manually on a case by case basis (i.e. Right click on the computer object and select run script).
Jump into the Script section in MEMCM (Software Library > Scripts) and click Create Script from the ribbon.
Give the script a Name, select the language as PowerShell and then copy and paste the script above (Tip: In the top right corner of the script block you can click Copy Script Text).

Click Next, This is where you need the details we noted earlier. MEMCM is great at pulling through the Param block parameters, all we need to do is amend the ClientID, ClientSecret and TenantId arguments as below. When finished click Next review the settings and then click next and then close.
Note
Don’t forget to Approve your Script.
Now choose your victim… erm I mean client computer from Assets and Compliance > Devices. Right click on the object and select Run Script, Select the script object you created and review the details and then let the script run :D. This can take about 2/5 minutes, as it keeps a loop going until the device is imported. When the script finishes if you look at the script out put you will see the following;

If you notice the last output shows the import status of the device.
In a Task Sequence in MEMCM
I wont go into how to create the entire Task Sequence for a device rebuild however I will explain how you can use the script to import the device into Autopilot during a Task Sequence weather it be a new one or a current one.
Head over to Software Library > Operating System > Task Sequences so we can get started.
I will be using a current Task Sequence for this Demo. There may be a future post on how to create a Task Sequence to re-build your device to a standard OS with Drivers and Import it to Autopilot.
My existing Task Sequence looks like this;

This is a very basic TS which just boots to Win PE, Installs windows and loads driver packs for VMware Virtual Machines (Only a test TS).
I no longer want to have to re-build the device and then import it to Autopilot Manually so instead we add the script to the top of the TS as follows.
- Click Add > General > Run Powershell Script
- Enter a Name and Description for the script
- Select Enter a PowerShell Script
- Click Add Script
- Copy the Script above and paste it into the window and click OK
- In the Parameters box enter
- -ClientID “” -ClientSecret “” -TenantId “”
- Select Bypass under the PowerShell Execution Policy drop-down
Your window should then look like this;

Hit Apply and then OK and give it a whirl on your machine (well not yours… always be sure to test it first :P)
When it runs you will see the following appear (depending on your Task Sequence);

The device will then be enrolled into Autopilot;

When the device then reboots after my task sequence I am presented with the expected Autopilot Enrolment window.
To Conclude
So I have shown two ways of using the script to enroll to Autopilot Unattended, now there is nothing preventing you running this from the command line with the same parameters however if you wanted to do it that way I would definitely look at Michael Niehaus’ Get-WindowsAutopilotInfo script (See the opening few paragraphs with the links to these) as this does not require an App Registration.
I did fully test these methods at the time of writing the blog but if you come across any information you think may be wrong then please leave a comment
I hope this is useful for your needs.
Categories
Analytics
App Deployment
Apple
Application Deployment
Azure
Azure Image Builder
Azure Resource Manager
Bicep
Compliance
ConfigMGR
DevOps
Endpoint Security
Entra ID
Graph API
Infrastructure as Code
Intune
KQL
Microsoft 365
Microsoft Fabric
Policy Configuration
Power Platform
PowerShell
Samsung
Tools
VLOG
Windows
Windows 365
WinGet
WUfB
YAML
Tags
ABM
App Registrations
ARM
ASR
Attack Surface
Autopatch
Autopilot
Azure
Azure Policy
Bicep
Clou
Cloud PC
Compliance
Conditional Access
CSP
Driver and Firmware
Enterprise Applications
Entra ID Connect
Features
Graph API
Group Policy
Hybrid
Hyper-V
Identity
Intune Policy
KME
Knox
Lab
Log Analytics
Mobile Devices
OMA-URI
Power BI
PowerShell
Security
Server
SSPR
Storage Accounts
Teams
User Experience
Virtualisation
Win32
Windows Updates
WinGet
WSL
WUfB


