Windows 365 Custom Images – Part 3 – Azure DevOps Deployment
Welcome to the third post in the series talking about Windows 365 Custom Images, and how we can use Azure Image Builder to create these images. In this series of posts, we will cover the following topics;
- Part 1 – The Foundations
- Part 2 – PowerShell Deployment
- Part 3 – DevOps Deployment (This Post)
- Part 4 – Azure Virtual Desktop UI Deployment
Some of you may be like Veruca Salt from Charlie and the Chocolate Factory, and want all of the goodies Now and opted to jump the second post in the series, and well, that is fine, I would have done the same thing 🤣, sorry not sorry.
In this post, we will be looking at how we can use Azure DevOps to deploy our Windows 365 Custom Image. Please follow the process carefully, as missing any of the steps could leave you scratching your head as to why it is not working.
This post assumes you have basic source control competency, and that you are familiar with the terminology such as, pull, push etc. If you are not, then I would recommend you read up on this before continuing.
You will also need to have the ability to use Git on your workstation.
Permission Requirements
For this post, we do need some additional permissions, however these can be short lived as once we configure the pipelines, service principals etc, we will only need the ability to manage the source data.
Azure DevOps
- You will need the ability to Create a Project in Azure DevOps
- You will need the ability to Create a Service Connection in an Azure DevOps Project
- Have at least 1 Self-Hosted Agent or 1 Microsoft Hosted Agent available to run the pipeline (Free Tier is fine, the code is designed to run from a free tier account) – Documentation on Agents
The free agents have a maximum run time of 1 hour and there are also limitations on monthly execution limits. As we go through this guide, you will notice that there are two pipelines to work around this been a problem.
Azure
- Global Administrator permissions to create the Service Principal & grant the required Application Permissions.
Getting Prepared
Azure DevOps Project & Service Connection
First of all, lets get the Azure DevOps Project created, I would recommend following the Microsoft Documentation on this. The name of the project is not important, but I would recommend using something that is meaningful to you.
Once you have the project created, we will need to create a Service Connection, again I would recommend following the Microsoft Documentation, ensuring you select Resource Group created in the Foundations post and you select Grant access permission to all pipelines.
Service Principal (App Registration)
You only need to run through this section if you want to upload the image to Windows 365, which I assume you do. If you do not, then you can skip this section.
Not that it’s a habit of this post… but I have another link… this time it’s to one of my previous posts, Create an Azure App Registration, the service principal will need the following permissions;
- CloudPC.ReadWrite.All – This is required to upload the image to Windows 365
- It will also need the Custom Role assigning on the resource group you created in the Foundations post. (By default this will be called Azure Image Builder Image Definition for
<Resource Group Name>)
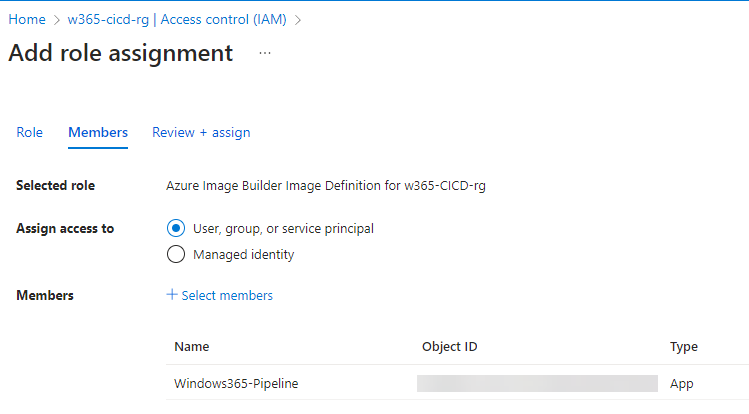
Once you have the Service Principal created, you will need to create a secret, and take note of the Application (client) ID and Client Secret & the Tenant ID for later use.
The Code
Ok, now we are ready to start getting into the juicy bits!!
Before we go any further, you will need to ensure you have cloned your repository to your local machine, ready to copy the code into the Azure DevOps Project.
You can get all of the code using the GitHub Resource link below.
Once you have download the code, and copied it into your local repository, we can start to update the code to suit your needs.
Image Template (BICEP)
The Image template file itself is located in the Templates folder, and is called Windows365.bicep. The only edits we need to make to this file for the purpose of this guide is the customizations, this is where we will define the applications we want to install on the image along with any other scripted or inline customization.
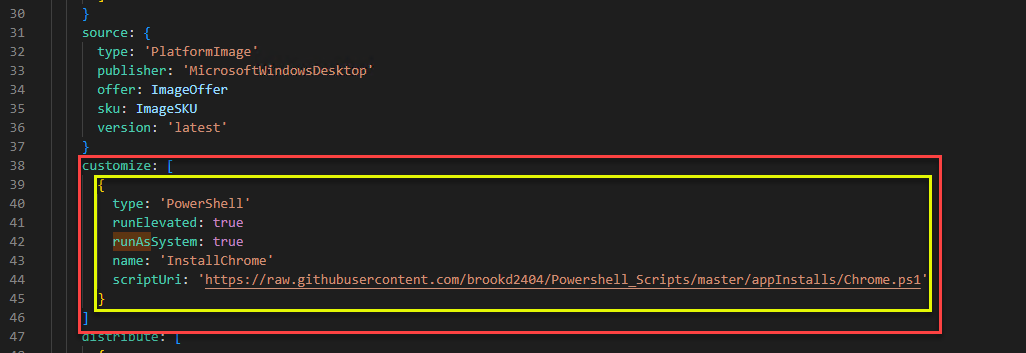
As you will see above there are two marked areas, the RED area is where you will define the customisation objects and the YELLOW area is a sample of what the customisation object looks like. You can read about more BICEP customisations objects HERE.
Once you have made all your customisations, we can move onto looking at the parameters file.
Parameters
You will notice from the codeset, that there is a parameters file, this is what drives the BICEP file (Apart from Customisations) in the Templates folder.
Separating the parameters from the BICEP file, allows us to use the same BICEP file for multiple deployments, without having to edit the BICEP file each time.
If we open up the Windows365.parameters.json file and take a look at the parameters that are available to set, all of which have descriptions to help you understand what they are for.
There is one key parameters that you will need to set that is unique to your environment, that is the AIBMSIName parameter. This is the name of the User Managed Identity in you resource group. If you are unsure of the name, you can find this in the Azure Portal, by navigating to the resource group you created in the Foundations post.
All of the other parameters are set to default values, which you can change if you wish, but the image would provision with the default values.
Pipelines (YAML)
As mentioned in the Getting Prepared section, we will be using two pipelines to cater for those using the free tier of Azure DevOps. The first pipeline will be used to create the image template and then invoke the build of the Managed Image, and the second pipeline will be used to upload the image to Windows 365.
If you are using a paid pipeline, you can combine the two pipelines into one, you will just need to ensure all of the correct variables are set and that you do not have any duplicate steps.
Pipeline 1 – Create Image Template & Build Managed Image
Pipeline Name – CreateManagedImage.yaml
This pipeline will create the image template and then invoke the build of the Managed Image, there are a couple of variables that you will need to update prior to running the pipeline, these are;
- Connection – The name of the Azure DevOps Service Connector with access to subscription (Created Above)
- subscriptionID – The subscription ID of the subscription you are deploying to
- resourceGroup – The name of the resource group you created in the Foundations post
- imageTemplateName – A name for the image template you want to create
- location – The region you want to deploy the resources to, i.e “UK South”
- template – Path to the BICEP file e.g. Templates/Windows365.bicep
- templateParameters – Path to the parameters file e.g. Parameters/Windows365.parameters.json
You will notice a commented out section in the pipeline, this section will allow you to create a schedule to run the pipeline on.
This pipeline also handles some other actions, such as clearing up existing templates, as this is not currently possible. We will cover the DeploymentActions.ps1 file in a later section
Pipeline 2 – Upload Image to Windows 365
Pipeline Name – DeployToW365.yaml
This pipeline will upload the image to Windows 365, again there are a couple of variables that you will need to update prior to running the pipeline, these are the same as above. However, we will be adding Pipeline Variables later in the post once we have published the code, and created the pipeline in DevOps.
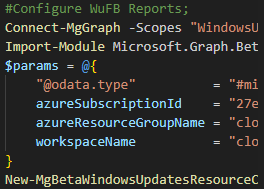
DeploymentActions.ps1
This script can be thought of as a boilerplate script, it is used to handle some of the actions that we run in a PowerShell script, this is customisable to your needs.
If you wish to amend the Provisioning Profile type, data etc, this can be found in this script, the same goes for the Required Modules sections of the script.
Publish the Code & Create/Run the Pipelines
Once you have updated the code to suit your needs, you will need to push the code to your Azure DevOps Project and then we can head over to Azure DevOps to create the pipelines.
Ok, so first of all, let us create the pipeline to create the image template and build the managed image.
- Open your DevOps Project
- In the left hand menu, select Pipelines
- Click Create Pipeline
- Select Azure Repos Git
- Select your repository
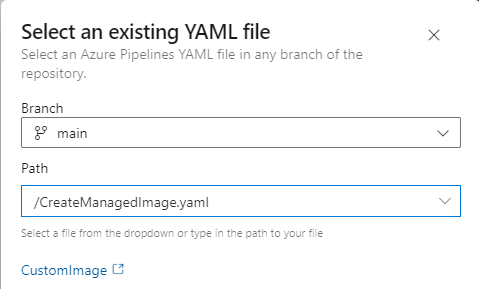
- Select Existing Azure Pipelines YAML file
- Select the CreateManagedImage.yaml file, and click Continue
- heck the details in the pipeline, and click Run
Ok, now we have the first pipeline running, we can create the second pipeline to upload the image to Windows 365.
- In the left hand menu, select Pipelines
- Click New Pipeline (Top Right)
- Select Azure Repos Git
- Select your repository
- Select Existing Azure Pipelines YAML file
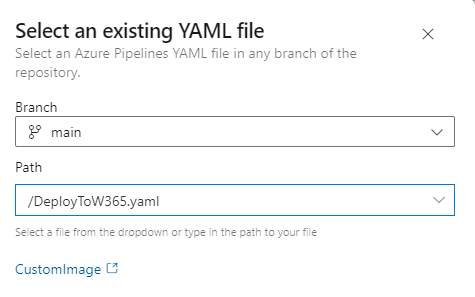
- Select the DeployToW365.yaml file, and click Continue
- Click Variables
- Click New variable
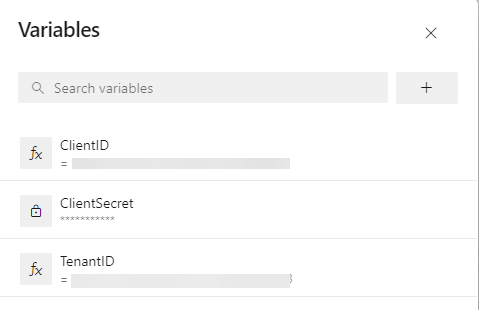
- Enter ClientID in the Name field, and the Application (client) ID from the Service Principal you created earlier in the Value field, and click OK
- Click the + icon in the top right of the variables section
- Enter ClientSecret in the Name field, and the Client Secret from the Service Principal you created earlier in the Value field, select Keep this value secret and click OK
- Click the + icon in the top right of the variables section
- Enter TenantID in the Name field, and the Directory (tenant) ID from the Service Principal you created earlier in the Value field, and click OK
You should end up with something that looks like this;
This time don’t click Run, instead use the dropdown next to it and click Save. We will amend the name of the Pipeline by clicking the ellipses next to the Run Pipeline button (Top Right), and then clicking Rename/Move. Once you have renamed your pipeline, you can click Run Pipeline.
When you click run, it will queue this job and it will wait for the first pipeline to complete, before running.
Sample Output(s)
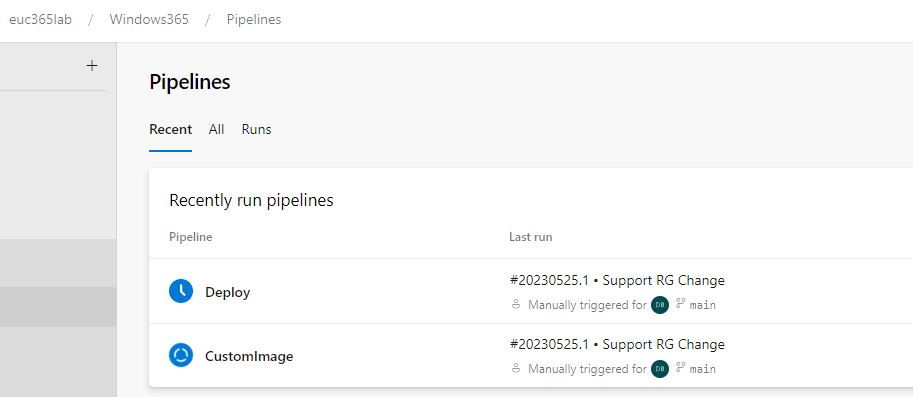
Overview of Pipelines
Create Managed Image Pipeline

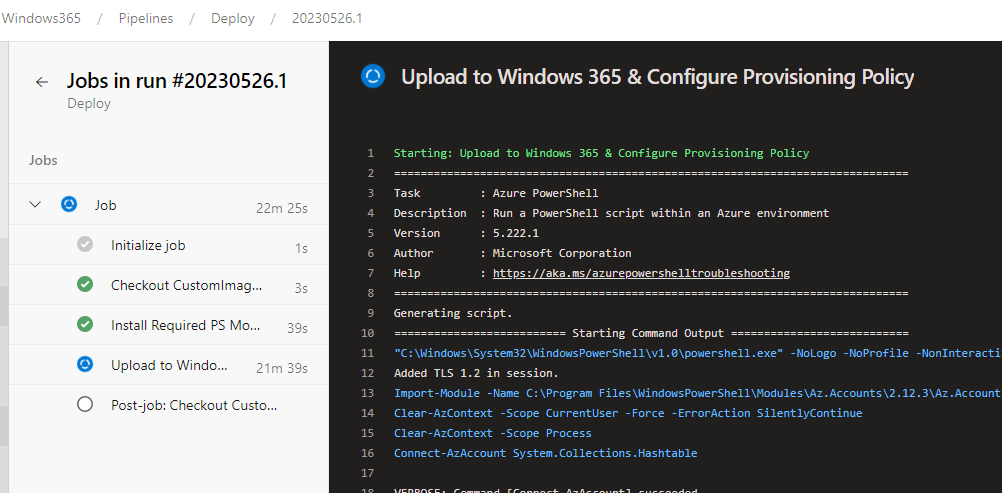
Deploy to Windows 365 Pipeline
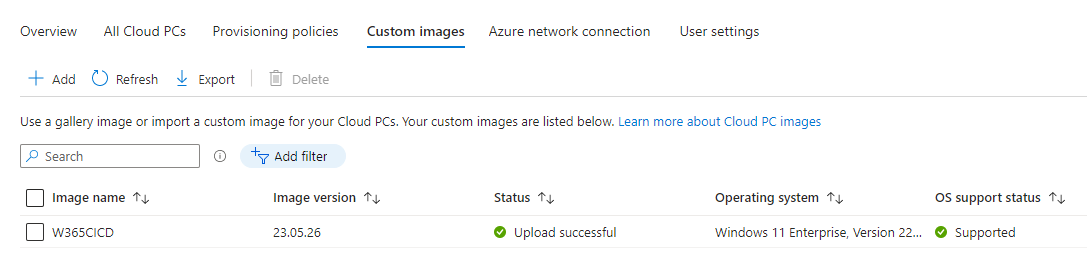
Windows 365 Image In the Console
Conclusion
Well this has been a fun post, this is by far the most in-depth post in the series, but man is it worth it!!
Stick around for the next post in the series, where we will be looking at how to create Image templates with the new UI Features in Azure Virtual Desktop within the Azure Portal.
As always, if you have any questions, please feel free to reach out to me on Twitter or leave a comment below.
Categories
Tags

Windows 365 Custom Images – Part 3 – Azure DevOps Deployment
Welcome to the third post in the series talking about Windows 365 Custom Images, and how we can use Azure Image Builder to create these images. In this series of posts, we will cover the following topics;
- Part 1 – The Foundations
- Part 2 – PowerShell Deployment
- Part 3 – DevOps Deployment (This Post)
- Part 4 – Azure Virtual Desktop UI Deployment
Some of you may be like Veruca Salt from Charlie and the Chocolate Factory, and want all of the goodies Now and opted to jump the second post in the series, and well, that is fine, I would have done the same thing 🤣, sorry not sorry.
In this post, we will be looking at how we can use Azure DevOps to deploy our Windows 365 Custom Image. Please follow the process carefully, as missing any of the steps could leave you scratching your head as to why it is not working.
This post assumes you have basic source control competency, and that you are familiar with the terminology such as, pull, push etc. If you are not, then I would recommend you read up on this before continuing.
You will also need to have the ability to use Git on your workstation.
Permission Requirements
For this post, we do need some additional permissions, however these can be short lived as once we configure the pipelines, service principals etc, we will only need the ability to manage the source data.
Azure DevOps
- You will need the ability to Create a Project in Azure DevOps
- You will need the ability to Create a Service Connection in an Azure DevOps Project
- Have at least 1 Self-Hosted Agent or 1 Microsoft Hosted Agent available to run the pipeline (Free Tier is fine, the code is designed to run from a free tier account) – Documentation on Agents
The free agents have a maximum run time of 1 hour and there are also limitations on monthly execution limits. As we go through this guide, you will notice that there are two pipelines to work around this been a problem.
Azure
- Global Administrator permissions to create the Service Principal & grant the required Application Permissions.
Getting Prepared
Azure DevOps Project & Service Connection
First of all, lets get the Azure DevOps Project created, I would recommend following the Microsoft Documentation on this. The name of the project is not important, but I would recommend using something that is meaningful to you.
Once you have the project created, we will need to create a Service Connection, again I would recommend following the Microsoft Documentation, ensuring you select Resource Group created in the Foundations post and you select Grant access permission to all pipelines.
Service Principal (App Registration)
You only need to run through this section if you want to upload the image to Windows 365, which I assume you do. If you do not, then you can skip this section.
Not that it’s a habit of this post… but I have another link… this time it’s to one of my previous posts, Create an Azure App Registration, the service principal will need the following permissions;
- CloudPC.ReadWrite.All – This is required to upload the image to Windows 365
- It will also need the Custom Role assigning on the resource group you created in the Foundations post. (By default this will be called Azure Image Builder Image Definition for
<Resource Group Name>)
Once you have the Service Principal created, you will need to create a secret, and take note of the Application (client) ID and Client Secret & the Tenant ID for later use.
The Code
Ok, now we are ready to start getting into the juicy bits!!
Before we go any further, you will need to ensure you have cloned your repository to your local machine, ready to copy the code into the Azure DevOps Project.
You can get all of the code using the GitHub Resource link below.
Once you have download the code, and copied it into your local repository, we can start to update the code to suit your needs.
Image Template (BICEP)
The Image template file itself is located in the Templates folder, and is called Windows365.bicep. The only edits we need to make to this file for the purpose of this guide is the customizations, this is where we will define the applications we want to install on the image along with any other scripted or inline customization.
As you will see above there are two marked areas, the RED area is where you will define the customisation objects and the YELLOW area is a sample of what the customisation object looks like. You can read about more BICEP customisations objects HERE.
Once you have made all your customisations, we can move onto looking at the parameters file.
Parameters
You will notice from the codeset, that there is a parameters file, this is what drives the BICEP file (Apart from Customisations) in the Templates folder.
Separating the parameters from the BICEP file, allows us to use the same BICEP file for multiple deployments, without having to edit the BICEP file each time.
If we open up the Windows365.parameters.json file and take a look at the parameters that are available to set, all of which have descriptions to help you understand what they are for.
There is one key parameters that you will need to set that is unique to your environment, that is the AIBMSIName parameter. This is the name of the User Managed Identity in you resource group. If you are unsure of the name, you can find this in the Azure Portal, by navigating to the resource group you created in the Foundations post.
All of the other parameters are set to default values, which you can change if you wish, but the image would provision with the default values.
Pipelines (YAML)
As mentioned in the Getting Prepared section, we will be using two pipelines to cater for those using the free tier of Azure DevOps. The first pipeline will be used to create the image template and then invoke the build of the Managed Image, and the second pipeline will be used to upload the image to Windows 365.
If you are using a paid pipeline, you can combine the two pipelines into one, you will just need to ensure all of the correct variables are set and that you do not have any duplicate steps.
Pipeline 1 – Create Image Template & Build Managed Image
Pipeline Name – CreateManagedImage.yaml
This pipeline will create the image template and then invoke the build of the Managed Image, there are a couple of variables that you will need to update prior to running the pipeline, these are;
- Connection – The name of the Azure DevOps Service Connector with access to subscription (Created Above)
- subscriptionID – The subscription ID of the subscription you are deploying to
- resourceGroup – The name of the resource group you created in the Foundations post
- imageTemplateName – A name for the image template you want to create
- location – The region you want to deploy the resources to, i.e “UK South”
- template – Path to the BICEP file e.g. Templates/Windows365.bicep
- templateParameters – Path to the parameters file e.g. Parameters/Windows365.parameters.json
You will notice a commented out section in the pipeline, this section will allow you to create a schedule to run the pipeline on.
This pipeline also handles some other actions, such as clearing up existing templates, as this is not currently possible. We will cover the DeploymentActions.ps1 file in a later section
Pipeline 2 – Upload Image to Windows 365
Pipeline Name – DeployToW365.yaml
This pipeline will upload the image to Windows 365, again there are a couple of variables that you will need to update prior to running the pipeline, these are the same as above. However, we will be adding Pipeline Variables later in the post once we have published the code, and created the pipeline in DevOps.
DeploymentActions.ps1
This script can be thought of as a boilerplate script, it is used to handle some of the actions that we run in a PowerShell script, this is customisable to your needs.
If you wish to amend the Provisioning Profile type, data etc, this can be found in this script, the same goes for the Required Modules sections of the script.
Publish the Code & Create/Run the Pipelines
Once you have updated the code to suit your needs, you will need to push the code to your Azure DevOps Project and then we can head over to Azure DevOps to create the pipelines.
Ok, so first of all, let us create the pipeline to create the image template and build the managed image.
- Open your DevOps Project
- In the left hand menu, select Pipelines
- Click Create Pipeline
- Select Azure Repos Git
- Select your repository
- Select Existing Azure Pipelines YAML file
- Select the CreateManagedImage.yaml file, and click Continue
- heck the details in the pipeline, and click Run
Ok, now we have the first pipeline running, we can create the second pipeline to upload the image to Windows 365.
- In the left hand menu, select Pipelines
- Click New Pipeline (Top Right)
- Select Azure Repos Git
- Select your repository
- Select Existing Azure Pipelines YAML file
- Select the DeployToW365.yaml file, and click Continue
- Click Variables
- Click New variable
- Enter ClientID in the Name field, and the Application (client) ID from the Service Principal you created earlier in the Value field, and click OK
- Click the + icon in the top right of the variables section
- Enter ClientSecret in the Name field, and the Client Secret from the Service Principal you created earlier in the Value field, select Keep this value secret and click OK
- Click the + icon in the top right of the variables section
- Enter TenantID in the Name field, and the Directory (tenant) ID from the Service Principal you created earlier in the Value field, and click OK
You should end up with something that looks like this;
This time don’t click Run, instead use the dropdown next to it and click Save. We will amend the name of the Pipeline by clicking the ellipses next to the Run Pipeline button (Top Right), and then clicking Rename/Move. Once you have renamed your pipeline, you can click Run Pipeline.
When you click run, it will queue this job and it will wait for the first pipeline to complete, before running.
Sample Output(s)
Overview of Pipelines
Create Managed Image Pipeline
Deploy to Windows 365 Pipeline
Windows 365 Image In the Console
Conclusion
Well this has been a fun post, this is by far the most in-depth post in the series, but man is it worth it!!
Stick around for the next post in the series, where we will be looking at how to create Image templates with the new UI Features in Azure Virtual Desktop within the Azure Portal.
As always, if you have any questions, please feel free to reach out to me on Twitter or leave a comment below.