Breaking Down Custom OMA-URI (CSP) Policies

Published On: June 30, 2020Last Updated: January 2, 2024By Tags: , , 8.7 min readViews: 743

What is an OMA-URI Policy?

Meaning: Open Mobile Alliance Uniform Resource Identifier

Traditionally when you implement a new piece of software which contains Group Policy Objects (GPO’s) to customise the feature of the application you would import the .adml and .admx files into the PolicyDefinitions folder located within SysVol (SYSVOL) for the domain or into the local PolicyDefinitions (C:WindowsPolicyDefinitions) folder.


If like me you are wanting to move most if not all of your policies to Intune for better MDM (Mobile Device Management) then you can run into a rather complex scenario where you need to ingest the .admx file and then work out how to configure your policies correctly. Now the first time I looked at this I thought ‘Oh man this looks tricky, its a job for later on’. However after putting it off for so long I finally dived into it and it turns out it isn’t as complicated as it looks.


The link to the Microsoft Guide can be found HERE!!, Feel free to head over and check it out. Hopefully this post/guide can help you out when it comes to creating your own.

Importing your ADMX file

For this example we will be using Google Chrome’s GPO’s, Not because they are simple because each policy has its own complexities but because it will be a common policy people will look to migrate to Intune. The ADMX files can be found on the Chrome for Enterprise Download Page, you can obtain the gpo files only be finding the Manage Chrome Browser section.


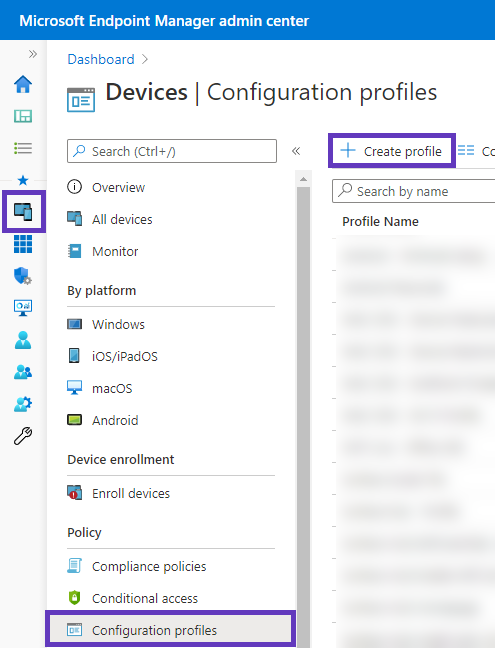
Once downloaded extract the .zip file and find the Chrome.admx (Normally located within WindowsADMX), Open this in a text editor (Notepad will do fine). Now we will switch over to Intune, From the Endpoint Manager Admin Center Homepage select Devices > Configuration Profiles from the navigation bar. Click Create profile.
Create Intune Profile
  • Click Create Profile
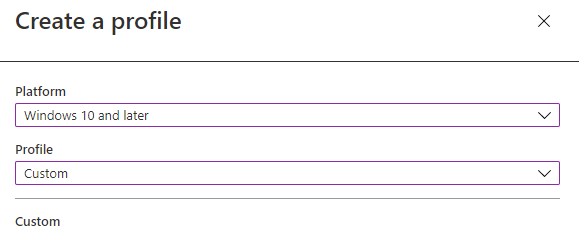
  • Select the following and click Create;
profileselection Custom
  • Enter the name for your profile (i.e Windows – Google Chrome Policy) and any other information you wish to add, click Next
  • Now here is the fun part, click
    Enter the name for your profile (i.e Windows – Google Chrome Policy) and any other information you wish to add, click Add
Add Custom
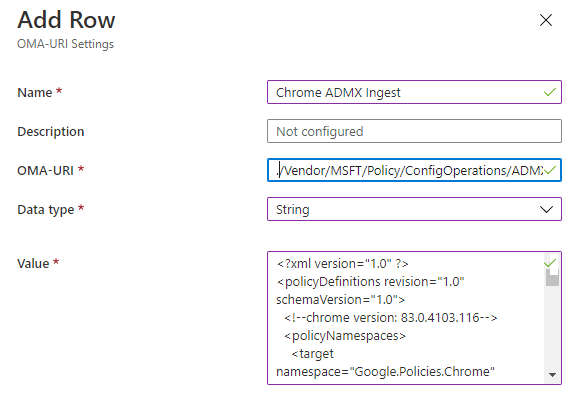
  • Enter a name (use something descriptive) and enter a description
  • The OMA-URI field should be something the the following
    • Copy to Clipboard
  • Data Type: String
  • Value: paste the contents of the chrome.admx file
  • Click Add
  • Now proceed to deploy the policy as desired
The above path determines what the OMA-URI is for future policies, for example if you enter; ./Vendor/MSFT/Policy/ConfigOperations/ADMXInstall/Chrome/Policy/ChromeAdmx as the OMA-URI for the device import the policies within the ADMX will then be formatted like Chrome~Policy~googlechrome~Startup.


The full path for the OMA-URI for the Homepage Setting would be ./{AppName}/Vendor/MSFT/Policy/Config/Chrome~Policy~googlechrome~Startup/HomepageLocation. The format of the URI is is {AppName}~{SettingType}~{CategoryandSubCategory}.


Now the category path may not just be a root category for example the startup settings will look like this Chrome~Policy~googlechrome~Startup to break it down.
  • AppName: Chrome (Set in the ADMX File ingest)
  • SettingType: Policy (Set in the ADMX File Ingest)
  • CategoryAndSubCategory:
    • Category: googlechrome
    • Sub Category: Startup
Now this may seem complicated at first glance, however do keep reading and I will explain how to obtain the paths and settings.

Finding and Creating Policies

Before we get started, if you haven’t already re-open the properties of the policy you created previously. You will also need to open the .admx files in your favourite text editor. Personally I use VSCode as it has syntax highlighting for XML files and many other useful features.

Note
This section requires this to be published to a device.
To get started Open the Chrome.admx and Chrome.adml (This will be in the language folder i.e. en-US within the .zip file) and launch REGEDIT (Registry Editor).


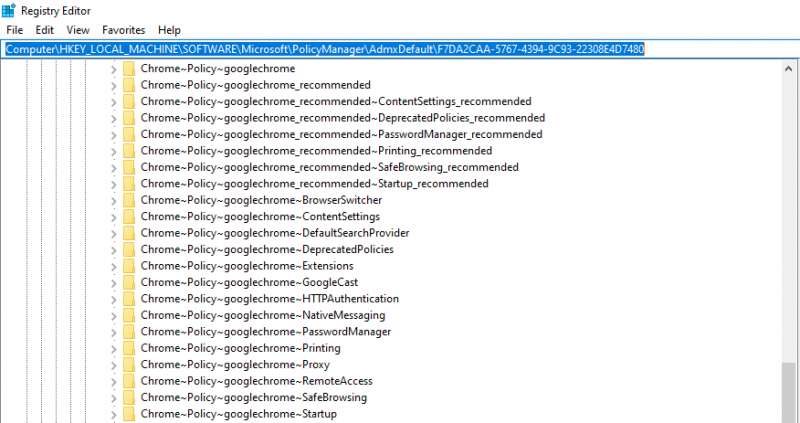
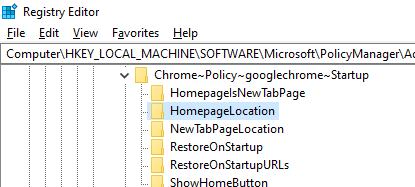
Let’s get started, within REGEDIT browse to HKEY_LOCAL_MACHINE/SOFTWARE/Microsoft/PolicyManager/AdmxDefault (There is always a random GUID per device, however this doesn’t make a difference to the policy so don’t worry), from here if you deployed the Chrome Policy as per the above steps you will see something like the below. (Note: this is showing Google Updates, but we will.
RegSnap PolicyADMX 1
As mentioned above they are broken down like below, we will be sticking with the Homepage setting which is within the startup category.


  • AppName: Chrome
  • SettingType: Policy
  • Categories:
    • Root Category: googlechrome
    • Sub Category: startup


Now if you look at the .admx file, you will see the following under the categories section
Cat SUbCat GC 1
As you can see that this correlates with with policy in the registry, now if you expand the policy within the registry you can see that the HomePage Location settings is created from within there.
Startup Shot
This is the part where you actually need the .admx file. Lets start by explaining why you need to use .admx file. For this example you are not only enabling or disabling a policy but you will be actually specifying a value. When you go to specify this value in Intune you will need to use the ValueName from within the ADMX File. See the below example;
HomepageSetting
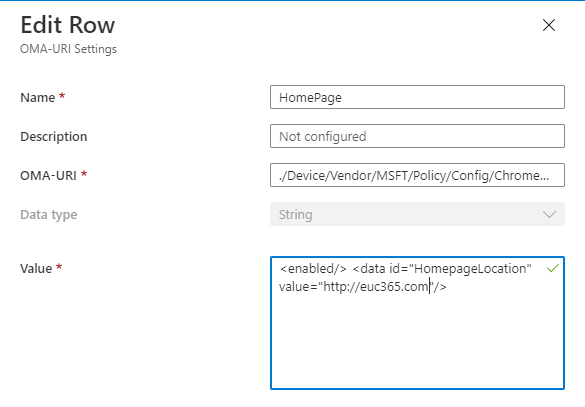
Lets break the policy setting down first, As always I would recommend naming the setting descriptively and also adding a description if you want more information about it. The OMA-URI would then be ./Device/Vendor/MSFT/Policy/Config/Chrome~Policy~googlechrome~Startup/HomepageLocation.

Class (Device or User)

One things to note here is the first section of the OMA-URI, It seems simple but you will need to specify if you want to apply this to a Device or User. Some policies are only available for Devices and likewise for Users. You can see this in the ADMX File by looking at the policy like below
PolicyClass
Now the HomePageLocation setting can be User or Device based so the class shows as Both. If this was a device only policy class=”Machine” and for a user only policy it would show as class=”User”.

AppName

As mentioned above the AppName is can be totally customisable however I wouldn’t advise that and I would keep it as simple and descriptive as possible.
For example, For this post I used Chrome as the AppName so the Policies show as Chrome~{SettingType}~{Root Category}~{Sub Category}. If I was to do another policy for Lenovo Vantage for example and set the AppName to LenovoVantage the polcies would show LenovoVantage~{SettingType}~{Root Category}~{Sub Category}.

SettingType

As we imported the ADMX into the Policy section (./Vendor/MSFT/Policy/ConfigOperations/ADMXInstall/{AppName}/Policy/{ADMXFileName}) of the ADMXInstall OMA-URI this part of the OMA-URI would always be policy.

Categories and Sub-Categories

This is detailed above but I will elaborate a little bit more here.
If you look at the .admx file, and browse to the categories section you will see lots of categories set with a parebrookabront category within there.
Cat SUbCat GC 1
If you work backwards you can see how this all comes together,
The OMA-URI is Chrome~Policy~{Root Category}~{Sub Category}
  • Sub Category: Startup
  • Root Category: googlechrome
Something to not here is that it is possible for a parent category to have another parent category to make matters more confusing. You could end up having a policy like {AppName}~Policy~{Parent Category 1}~{Parent Category 2}~{Sub Category} and so on… Just something to always check.
This is partly the reason to always check the registry when creating polices.

The Policy Itself

So finally we come to the policy itself, at the end all the OMA-URI string comes the setting, in this case HomePageLocation.
HomepageKey 1024x120 1
This is derived again from the .admx file, if you search for the policy you will come across something like the above screenshot. You will notice that the policy is based on the DisplayName property. We won’t cover setting the value in this section as I feel it deserves its own.

The Policy Value/Setting

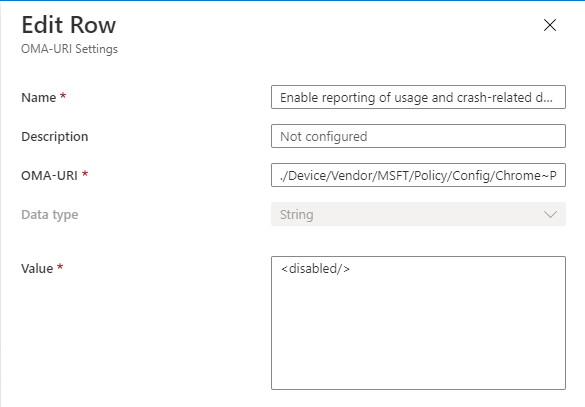
Some setting are really simple to configure, for example if you want to disable something like MetricsReportingEnabled  you can simply just add like below;
simpledisable
Others like the HomePageLocation are not complicated but require a little bit more than just a simple disable or enable switch as you need to specify a value for the property.
Again jumping back into the .admx file, if you look at the last highlighted section of the below screenshot you can see that there is a ValueName, now this is the value we need want to change.
HomepageKey 1024x120 1
to do this you would need to write the policy string like the below screenshot
HomepageSetting
If you look at the data id section, this is where you would put the value name in out of the .admx file, from there you would then set the value of that property for example https://euc365.com.


If you apply this policy and sync it to your device you will notice that it will change the Homepage upon start up.


Now… Here is another example of adding a string to a policy which requires multiple values. This once is not so much tricky but its messy.


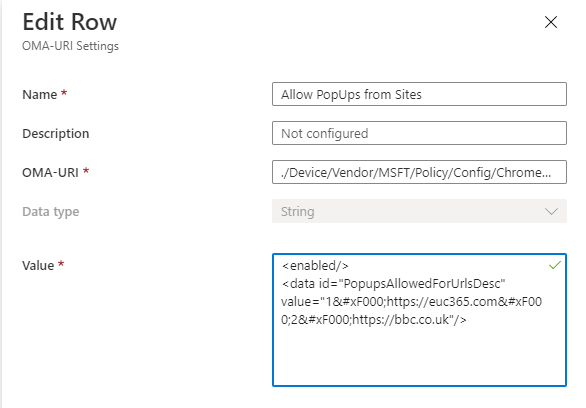
For this example we will use the Allow Pop ups for certain sites, I will start off by showing you the screenshot of the policy itself
Annotation 2020 07 02 123120
You will notice that at the start and end of each URL there is a rather ugly looking set of characters, now this is where is can get messy. The pre-URL string is the only one that needs to be changed per entry. If you think of this like a list, option 1 in the list is https://euc365.com and option 2 is http://bbc.co.uk, As you can see in the screenshot the pre-URL has a number which needs to be incremented each time you add another URL.


If you are just having one URL you don’t need to add the final , However if you are using multiple values you will need to add that to the end of the URL and then follow it up with you next URL.
Note
The last URL in the sequence should not be followed by 
Looking at putting the URL together you will end up with something like 1 + https://euc365.com +  + Following URLs, For a single url it would be 1 + https://euc365.com