Autopilot Enrolment Terms of Use
Why would I want to do this? Whats the Purpose?
You maybe asking yourself why should I be adding Terms of use to Autopilot Enrolment? Well there are a few use cases that spring to mind.
The first been accepting an It acceptable use policy, for many years users have come to collect devices from a field office and/or had the devices delivered to them by an internal tech. Well in the current day and age of Modern Management and Windows Autopilot you now have the option to ship straight from the vendor to the end user, ensuring that the user accepts the policy prior to using the device maybe an absolute must for your organisation.
Not only can you present these terms of use, but you can also see who has accepted and or denied these from the Azure portal, cool right?
Did I also mention that you can add multiple languages for your terms of use, No? Well it’s actually super easy to do so without creating additional policies etc.
Creating your Terms of Use
We will be making use of conditional access and the inbuilt terms of use from the Azure portal, meaning we are taking advantage of products you may already have licenses for.
Without further ado, lets get started.
- Head over to the Conditional Access Pane in the Azure portal.
- Under the Manage section, click Terms of Use
- In the right-hand pane, click New terms
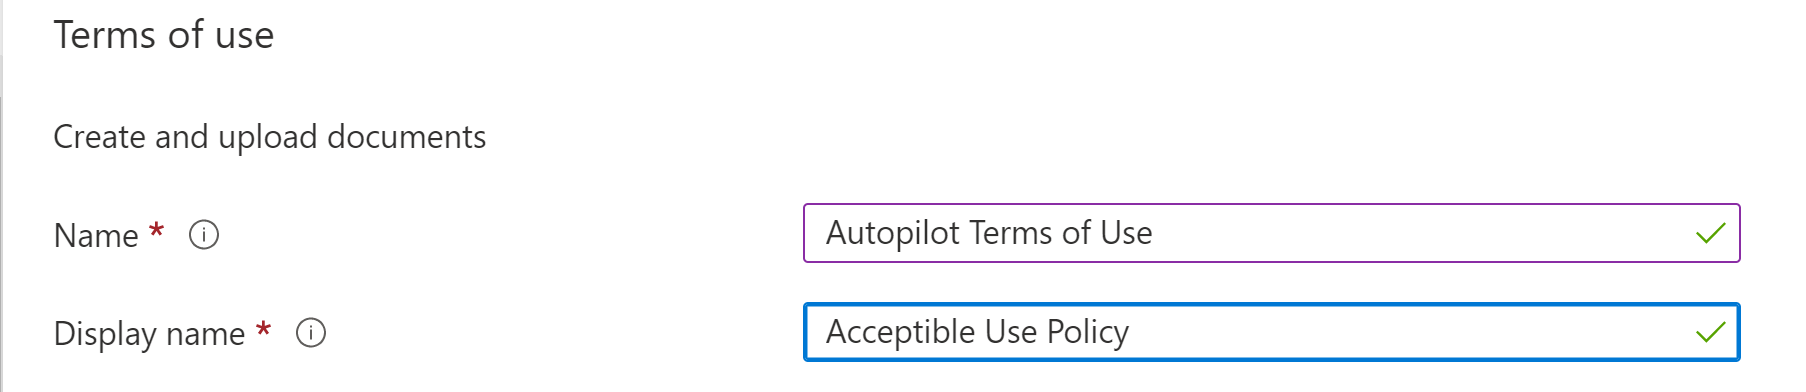
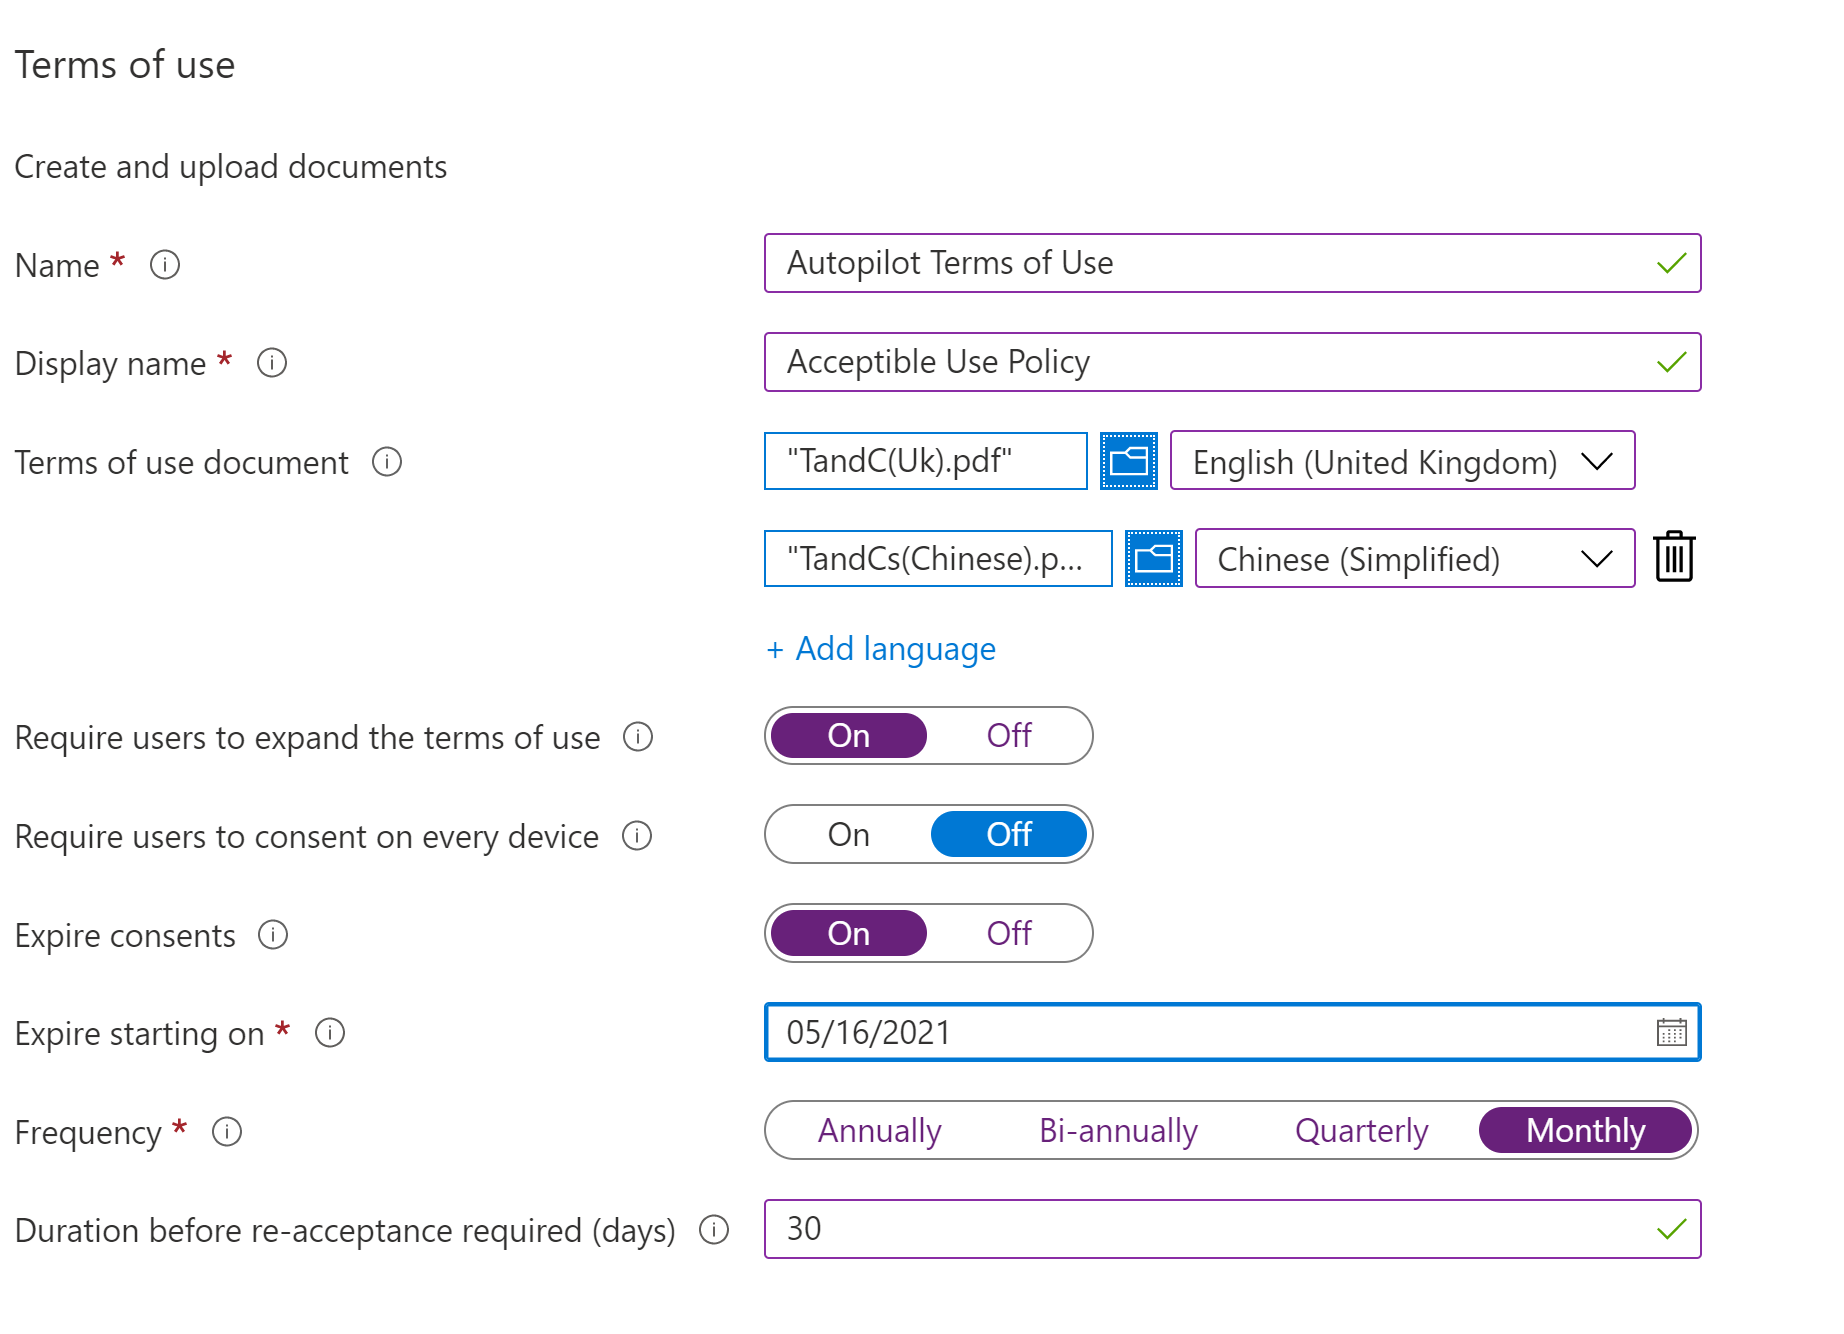
- Complete the Name and Display Name fields
- Click on the box that says Upload required PDF, Locate and upload the PDF of your Terms.
- Select your default language

At this point you can upload the same terms in a different language, simply click + Add language, Upload the PDF and then select its language from the drop down to the right-hand side.
- Require user to expand the terms of use, now this is optional, you can choose to require the users to expand the terms of use or not. Personally, I prefer too as if the terms are broken you can show that they would have had to read them.
- Require users to consent on every device, This one HAS to be set to Off

This has to be Off because, if you do switch it on the device has to be Joined to Azure AD Already and in fully working order. You will see this warning if you do attempt to switch it on.
- Expire Consents, again this one is optional, if you would like the user to accept it once in then never have to see it again then you can leave this off. However, If you would like users to have to accept this on another Autopilot build after a specified period of time then flick the switch on.
- Expire Starting On, use the date picker and select the date you are on.
- Frequency, Set this to your desired frequency. I like to set this to Monthly.
- Duration before re-acceptance required (days), set this to the amount of days you would like before the end user has to perform re-acceptance.
Your final terms of use setting should look something like this;
- Conditional Access, you can choose to create a policy later, or select Custom Policy which will allow you to create the policy now.
- Click Create
- If you chose to create a Custom Policy you will be redirected to a Conditional Access policy configuration.
- Give your Policy a name e.g. Autopilot Enrolment Terms of Use Policy
- Assignments, To start with I would test this out with a bunch of your techs, or users who give good feedback to ensure that this suits your organizational needs. Make sure this is targeted to users.
- Cloud apps and actions, now this is where we specify it to only apply to Intune Enrolment (Autopilot).
- Under the Cloud Apps Slider, select Select Apps, Click on the selections
- Type Microsoft Intune Enrollment and click the app to select it, Click Select.
- Conditions, You can change this to suit your needs, I generally select the Device Platform as Windows
- Access Control – Grant, Select Grant Access, and then select your Terms of Use policy like below
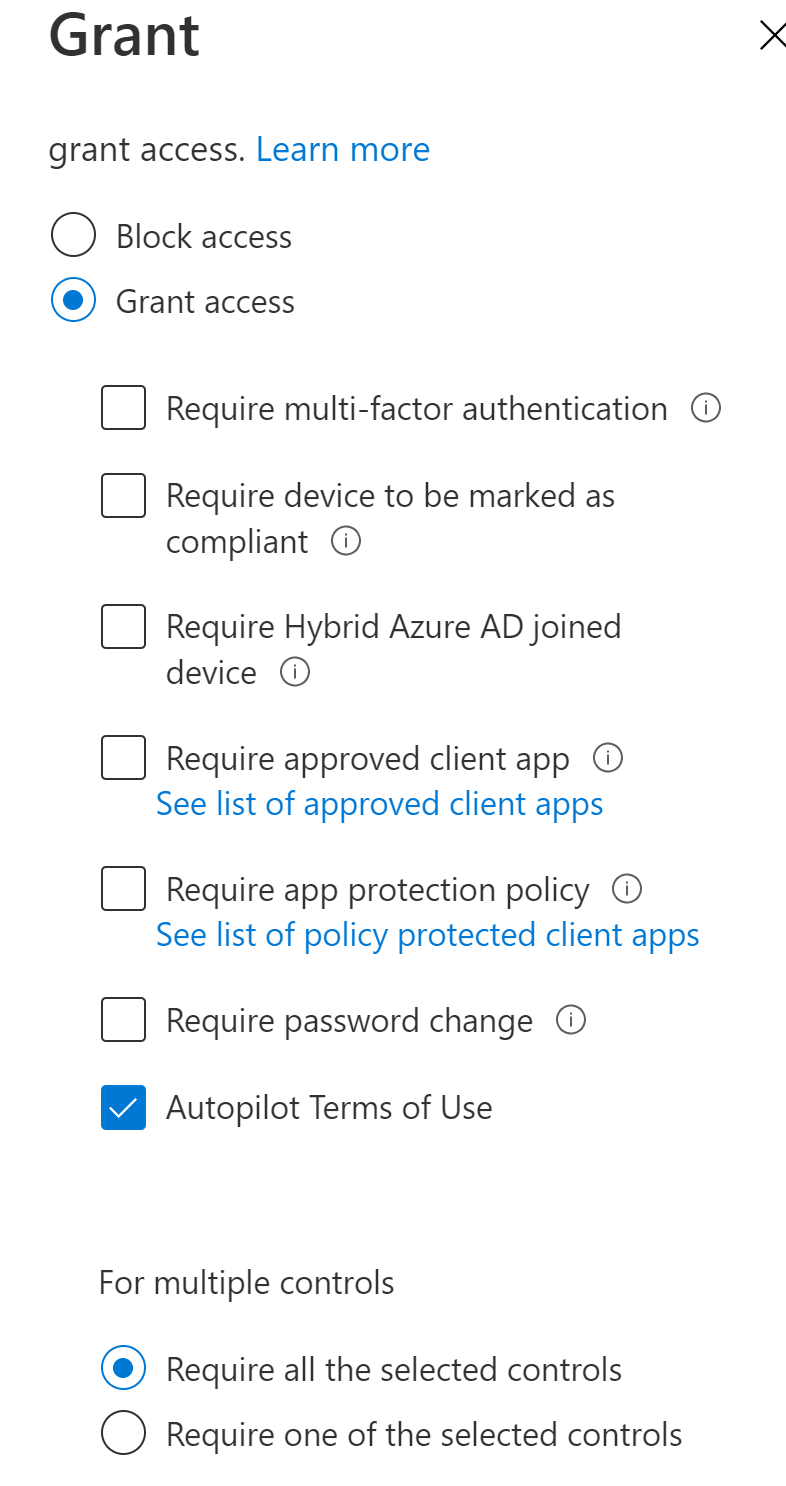
- Click Select
– Session, You don’t need to select a Session - At the bottom of the browser window, ensure that you have set Enable Policy to On.
- Click Create
Well that’s a wrap from a configuration perspective, lets jump into some testing and see what the end user will experience.
So what does it look like?
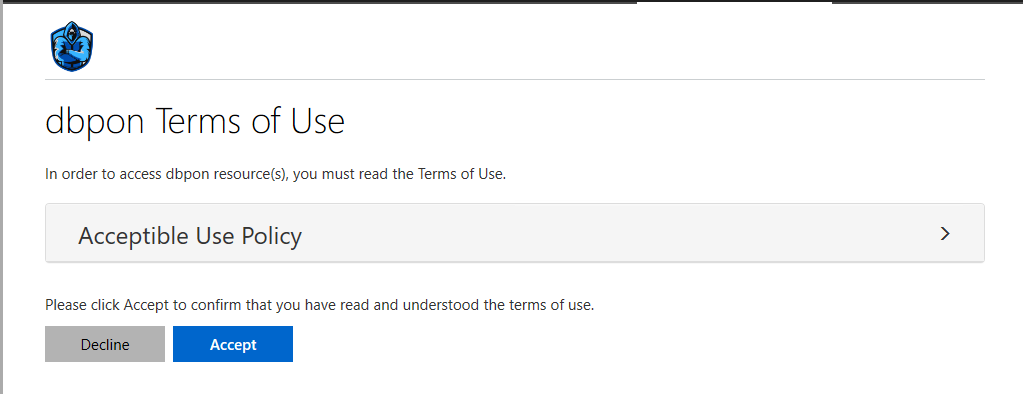
Firstly, you will hit the standard Autopilot Screen where you log in with your details and MFA etc. You will then notice that you are re-directed to a screen that represents the below;
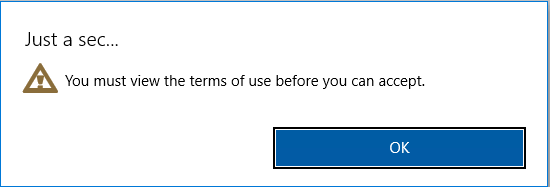
If you selected to force the users to expand the terms, but just click accept you will see the message below pop up.
If you expand the terms you will see your terms in an embedded PDF viewer, once you have finished click Accept, you will then just continue along your way on a standard Autopilot build.
How do I see who’c Accepted/Declined?
This is super easy to check, Head back over to the Conditional Access Pane in the Azure portal. From here click Terms of Use, Straight away you can see the numbers for Accepted and Declined.

If you go ahead and click those numbers, you can see who has/hasn’t accepted the policy, you can also download the list should it be required.
Conclusion
For something so simple, it is quite effective an there may be a ton of use cases for this in other scenarios, however, I was asked to scope this out for a customer I was working with.
I hope it may be some use :D, enjoy your day guys and girls!!!.
Categories
Tags

Autopilot Enrolment Terms of Use
Why would I want to do this? Whats the Purpose?
You maybe asking yourself why should I be adding Terms of use to Autopilot Enrolment? Well there are a few use cases that spring to mind.
The first been accepting an It acceptable use policy, for many years users have come to collect devices from a field office and/or had the devices delivered to them by an internal tech. Well in the current day and age of Modern Management and Windows Autopilot you now have the option to ship straight from the vendor to the end user, ensuring that the user accepts the policy prior to using the device maybe an absolute must for your organisation.
Not only can you present these terms of use, but you can also see who has accepted and or denied these from the Azure portal, cool right?
Did I also mention that you can add multiple languages for your terms of use, No? Well it’s actually super easy to do so without creating additional policies etc.
Creating your Terms of Use
We will be making use of conditional access and the inbuilt terms of use from the Azure portal, meaning we are taking advantage of products you may already have licenses for.
Without further ado, lets get started.
- Head over to the Conditional Access Pane in the Azure portal.
- Under the Manage section, click Terms of Use
- In the right-hand pane, click New terms
- Complete the Name and Display Name fields
- Click on the box that says Upload required PDF, Locate and upload the PDF of your Terms.
- Select your default language
At this point you can upload the same terms in a different language, simply click + Add language, Upload the PDF and then select its language from the drop down to the right-hand side.
- Require user to expand the terms of use, now this is optional, you can choose to require the users to expand the terms of use or not. Personally, I prefer too as if the terms are broken you can show that they would have had to read them.
- Require users to consent on every device, This one HAS to be set to Off
This has to be Off because, if you do switch it on the device has to be Joined to Azure AD Already and in fully working order. You will see this warning if you do attempt to switch it on.
- Expire Consents, again this one is optional, if you would like the user to accept it once in then never have to see it again then you can leave this off. However, If you would like users to have to accept this on another Autopilot build after a specified period of time then flick the switch on.
- Expire Starting On, use the date picker and select the date you are on.
- Frequency, Set this to your desired frequency. I like to set this to Monthly.
- Duration before re-acceptance required (days), set this to the amount of days you would like before the end user has to perform re-acceptance.
Your final terms of use setting should look something like this;
- Conditional Access, you can choose to create a policy later, or select Custom Policy which will allow you to create the policy now.
- Click Create
- If you chose to create a Custom Policy you will be redirected to a Conditional Access policy configuration.
- Give your Policy a name e.g. Autopilot Enrolment Terms of Use Policy
- Assignments, To start with I would test this out with a bunch of your techs, or users who give good feedback to ensure that this suits your organizational needs. Make sure this is targeted to users.
- Cloud apps and actions, now this is where we specify it to only apply to Intune Enrolment (Autopilot).
- Under the Cloud Apps Slider, select Select Apps, Click on the selections
- Type Microsoft Intune Enrollment and click the app to select it, Click Select.
- Conditions, You can change this to suit your needs, I generally select the Device Platform as Windows
- Access Control – Grant, Select Grant Access, and then select your Terms of Use policy like below
- Click Select
– Session, You don’t need to select a Session - At the bottom of the browser window, ensure that you have set Enable Policy to On.
- Click Create
Well that’s a wrap from a configuration perspective, lets jump into some testing and see what the end user will experience.
So what does it look like?
Firstly, you will hit the standard Autopilot Screen where you log in with your details and MFA etc. You will then notice that you are re-directed to a screen that represents the below;
If you selected to force the users to expand the terms, but just click accept you will see the message below pop up.
If you expand the terms you will see your terms in an embedded PDF viewer, once you have finished click Accept, you will then just continue along your way on a standard Autopilot build.
How do I see who’c Accepted/Declined?
This is super easy to check, Head back over to the Conditional Access Pane in the Azure portal. From here click Terms of Use, Straight away you can see the numbers for Accepted and Declined.
If you go ahead and click those numbers, you can see who has/hasn’t accepted the policy, you can also download the list should it be required.
Conclusion
For something so simple, it is quite effective an there may be a ton of use cases for this in other scenarios, however, I was asked to scope this out for a customer I was working with.
I hope it may be some use :D, enjoy your day guys and girls!!!.