Disable WiFi MAC Randomization on Samsung with Intune
Why disable MAC Randomization?
In some scenarios setting static IP Addresses for mobile devices is a requirement (such as EPOS, Kiosks, Meeting Room Self-Service Tablets etc.). With most modern Mobile Devices, they are shipped with MAC Randomization enabled by default, and that is certainly the case for Samsung Tablets.
This was introduced back in Android 8.0 when probing for new networks, however, starting in Android 10 this was enabled by default for client mode activities as mentioned in the Android Documentation.
MAC randomization prevents listeners from using MAC addresses to build a history of device activity, thus increasing user privacy.
What is the solution?
The solution is to use the Knox Service Plugin from Samsung, coupled with an Intune OEM Configuration profile. By using both of these elements you can control various aspects of the device configuration, however, we are only going to to cover MAC Randomization.
Myself and my colleague have seen issues with this when using Certificate Authentication for your WiFi. That is not to say it will not work, you will have to configure the Knox Service Plugin to connect to your network with certificate.
For this post I will be focusing on the core configuration and a WPA2 network.
Pre-requisites
To have the ability to disable MAC Randomization on Samsung Devices with Intune you will need the following;
- Samsung Knox Platform for Enterprise Commercial Key
- Samsung Knox Service Plugin Managed Google Play App
- Intune Licenses
- Intune Administrator Role (Custom RBAC Roles are not in scope)
If you do not have a Samsung Knox license or account, take a look at my Getting Started with Samsung Knox for Enterprise post.
Import the Samsung Knox Service Plugin App
- Browse to Microsoft Intune
- Select Apps from the left-hand pane, then select Android
- Select Managed Google Play app from the App type list, then press Select
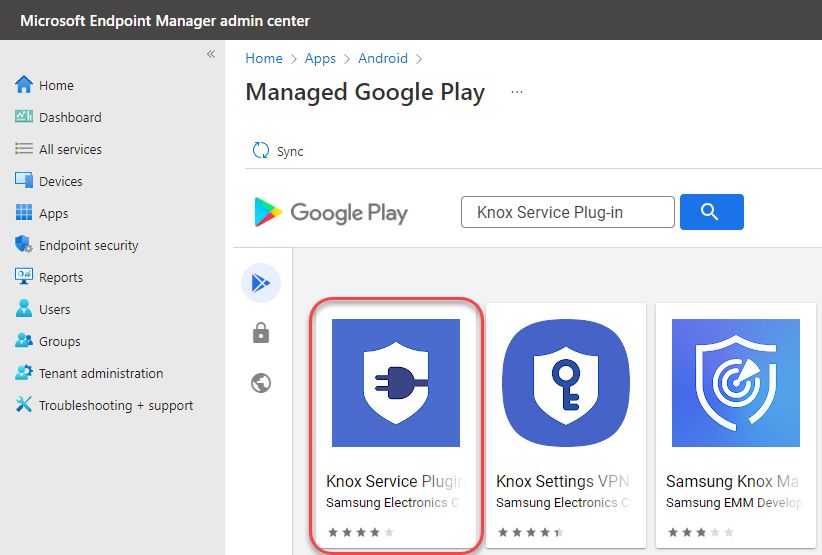
- Search Knox Service Plugin, select the app shown below

- Select Approve, read the permission page, if you are happy click Approve
- Select Keep approved when app requests new permissions, then click Done
- Click Sync
Allow up to 15 minutes for the application to appear, if it doesn’t appear go back to the Managed Google Play Store and click Sync again.
Once the application has synced assign this to your devices.
Obtain the commercial key for Knox
- Login to Samsung Knox
- Hover over Knox Platform for Enterprise, then click See License
- Select the Commercial Keys, locate the Knox Platform for Enterprise: Premium Edition key
- Copy the contents of the License Number field.
Creating the OEM Config Profile
- Browse to Microsoft Intune
- Select Devices from the left-hand pane, then select Android
- Select Configuration Profiles
- Click Create Profile
- Platform: Android Enterprise
- Profile Type: OEMConfig
- Click Create
- Enter a Name and Descriptions
- Click Select an OEMConfig app
- Select Knox Service Plugin, then click Select
- Configure the following settings:
- Profile name: <suitable name for your organization>
- KPE Premium or Knox Suite License key: The commercial key you obtained in the previous section
- Debug Mode: I would only change this to true during testing, I would not change this if your devices in production have the KSP installed.
- Locate Device-wide policies (Selectively applicable to Fully Manage Device (DO) or Work Profile-on company owned devices (WP-C) mode as noted), then click Configure
- Select true on the Enable device policy controls slider
- Locate Device customization controls (Premium), then click Configure
- Select true on the Enable device customization slider
- In the left-pane select Device-wide policies (Selectively applicable to Fully Manage Device (DO) or Work Profile-on company owned devices (WP-C) mode as noted)
- Locate Device Controls, then click Configure
- Locate Wi-Fi Policy, then click Configure and set the following settings
- Enable Wi-Fi policy controls: true
- Allow Automatic Wi-Fi Connection to saved SSIDs: true
- Allow Wi-Fi State Change: true
- Allow to configure Wi-Fi (Configure details below): true
- In the left-pane select Knox Service Plugin
- Locate Wi-Fi Configuration, then click Configure
- In the left-hand pane click the three ellipses (…) next to Wi-Fi Configurations, then click Add Setting
- Enter you network details, then change the Skip Mac randomization slider to true
Your Wireless Credentials can be seen in plain text when using a PSK.
- The policy is not in a state to disable MAC randomization, complete the policy creation and add any scope tags and Assignments on the next pages.
Testing
Now the policy is created, if you haven’t already done so assign this to a group that contains test devices. If you want visibility that the settings have applied properly, change the Debug mode setting to true within your OEMConfig policy.
You will also need to assign the Knox Service plugin to the same group as the OEMConfig Profile.
You can only assign one KSP profile to a device at any given time.
Once you deploy the application and configuration to the device, you will be prompted to to Agree the licence terms first, without doing so the Knox Service Plugin will not function.
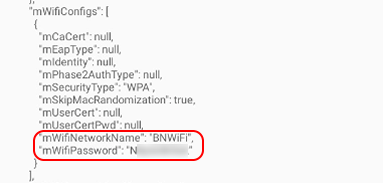
After you have agreed the licence terms, launch the **Knox Service Plugin** app. Press on the Configuration on …. section, here you will see the configuration applied to your device. If you press on the Configuration results in the top left-hand corner, and then select Policies received you will see the JSON representation of the policy you have defined.
As mentioned previously, you will see your PSK in plain text, as shown below.

You will not be able to see on the network side, that this device is connecting with the correct MAC Address.
Please don’t forget to change debug mode to false before a production rollout
Conclusion
There are many many things you can do with the Knox Service Plugin, and I have been told by a Samsung Support rep that this can work with a Certificate Based network. However, I do not have the means to test therefore it is not included in this guide. Should I have a requirement for it in the future you can bet your last dollar I will blog about it :). Here
Categories
Tags
Disable WiFi MAC Randomization on Samsung with Intune
Why disable MAC Randomization?
In some scenarios setting static IP Addresses for mobile devices is a requirement (such as EPOS, Kiosks, Meeting Room Self-Service Tablets etc.). With most modern Mobile Devices, they are shipped with MAC Randomization enabled by default, and that is certainly the case for Samsung Tablets.
This was introduced back in Android 8.0 when probing for new networks, however, starting in Android 10 this was enabled by default for client mode activities as mentioned in the Android Documentation.
MAC randomization prevents listeners from using MAC addresses to build a history of device activity, thus increasing user privacy.
What is the solution?
The solution is to use the Knox Service Plugin from Samsung, coupled with an Intune OEM Configuration profile. By using both of these elements you can control various aspects of the device configuration, however, we are only going to to cover MAC Randomization.
Myself and my colleague have seen issues with this when using Certificate Authentication for your WiFi. That is not to say it will not work, you will have to configure the Knox Service Plugin to connect to your network with certificate.
For this post I will be focusing on the core configuration and a WPA2 network.
Pre-requisites
To have the ability to disable MAC Randomization on Samsung Devices with Intune you will need the following;
- Samsung Knox Platform for Enterprise Commercial Key
- Samsung Knox Service Plugin Managed Google Play App
- Intune Licenses
- Intune Administrator Role (Custom RBAC Roles are not in scope)
If you do not have a Samsung Knox license or account, take a look at my Getting Started with Samsung Knox for Enterprise post.
Import the Samsung Knox Service Plugin App
- Browse to Microsoft Intune
- Select Apps from the left-hand pane, then select Android
- Select Managed Google Play app from the App type list, then press Select
- Search Knox Service Plugin, select the app shown below


- Select Approve, read the permission page, if you are happy click Approve
- Select Keep approved when app requests new permissions, then click Done
- Click Sync
Allow up to 15 minutes for the application to appear, if it doesn’t appear go back to the Managed Google Play Store and click Sync again.
Once the application has synced assign this to your devices.
Obtain the commercial key for Knox
- Login to Samsung Knox
- Hover over Knox Platform for Enterprise, then click See License
- Select the Commercial Keys, locate the Knox Platform for Enterprise: Premium Edition key
- Copy the contents of the License Number field.
Creating the OEM Config Profile
- Browse to Microsoft Intune
- Select Devices from the left-hand pane, then select Android
- Select Configuration Profiles
- Click Create Profile
- Platform: Android Enterprise
- Profile Type: OEMConfig
- Click Create
- Enter a Name and Descriptions
- Click Select an OEMConfig app
- Select Knox Service Plugin, then click Select
- Configure the following settings:
- Profile name: <suitable name for your organization>
- KPE Premium or Knox Suite License key: The commercial key you obtained in the previous section
- Debug Mode: I would only change this to true during testing, I would not change this if your devices in production have the KSP installed.
- Locate Device-wide policies (Selectively applicable to Fully Manage Device (DO) or Work Profile-on company owned devices (WP-C) mode as noted), then click Configure
- Select true on the Enable device policy controls slider
- Locate Device customization controls (Premium), then click Configure
- Select true on the Enable device customization slider
- In the left-pane select Device-wide policies (Selectively applicable to Fully Manage Device (DO) or Work Profile-on company owned devices (WP-C) mode as noted)
- Locate Device Controls, then click Configure
- Locate Wi-Fi Policy, then click Configure and set the following settings
- Enable Wi-Fi policy controls: true
- Allow Automatic Wi-Fi Connection to saved SSIDs: true
- Allow Wi-Fi State Change: true
- Allow to configure Wi-Fi (Configure details below): true
- In the left-pane select Knox Service Plugin
- Locate Wi-Fi Configuration, then click Configure
- In the left-hand pane click the three ellipses (…) next to Wi-Fi Configurations, then click Add Setting
- Enter you network details, then change the Skip Mac randomization slider to true
Your Wireless Credentials can be seen in plain text when using a PSK.
- The policy is not in a state to disable MAC randomization, complete the policy creation and add any scope tags and Assignments on the next pages.
Testing
Now the policy is created, if you haven’t already done so assign this to a group that contains test devices. If you want visibility that the settings have applied properly, change the Debug mode setting to true within your OEMConfig policy.
You will also need to assign the Knox Service plugin to the same group as the OEMConfig Profile.
You can only assign one KSP profile to a device at any given time.
Once you deploy the application and configuration to the device, you will be prompted to to Agree the licence terms first, without doing so the Knox Service Plugin will not function.
After you have agreed the licence terms, launch the **Knox Service Plugin** app. Press on the Configuration on …. section, here you will see the configuration applied to your device. If you press on the Configuration results in the top left-hand corner, and then select Policies received you will see the JSON representation of the policy you have defined.
As mentioned previously, you will see your PSK in plain text, as shown below.


You will not be able to see on the network side, that this device is connecting with the correct MAC Address.
Please don’t forget to change debug mode to false before a production rollout
Conclusion
There are many many things you can do with the Knox Service Plugin, and I have been told by a Samsung Support rep that this can work with a Certificate Based network. However, I do not have the means to test therefore it is not included in this guide. Should I have a requirement for it in the future you can bet your last dollar I will blog about it :). Here






thought ide found a solution until i read that this isnt for cert based eap\tls authentication, im happy to help create a process with you so you can blog it, i have the means to implement it and test it.
Hi Andy,
I would love to support you where I can, I no longer have access to any Samsung Devices so I wouldn’t be able to give a ton of input. Have you tried reaching out to Samsung Support from the Knox Portal? If so, have they been able to shed any light on it?
The issue I forsaw in this was how it would locate the certificate Intune published to the device, I would have assumed that it would need to be deployed via the KME OEM settings, but I never dug past the thought of it.