Backup and Import Conditional Access Policies
Why backup Conditional Access Policies?
Why would you need to back up something that runs in stored and hosted on Azure? Well there are numerous answers to this question really.
- If you make a change and you break something you can look back and analyse what it was
- You can make copies of the policy easily rather than having two windows side by side
- In case one is deleted… (Let’s hope this is never the case)
- To review the maturity of your policies (Lets say you started from ground zero and now have over 100 policy settings… Might be nice to review what you’ve done)
We also live in a world of change management and service improvement so there is always a need to make changes to policies and configurations. If you have or are moving from traditional group policy you will know that you can run an HTML report or a backup before you go ahead and make any changes.
Well when using Intune there was no way to export or backup your profiles or policies from the console… I have seen people taking screenshots of the pages as a backup of the policies which is far from an ideal scenario.
What if I told you there is a way you can back-up your configuration policies using the Microsoft Graph API?? Well it’s possible and it’s easier than you think.
This is part of a series of posts about backing up and importing policies and profiles, so if you feel like you’ve read this part before then you probably have.
Back when I wrote my first post about these (HERE) the script just backed up the policies/profiles, however over time they have grown into scripts that you can also use to re-import these policies/profile.
This one is the Third in the series, where we will focus on Conditional Access Policies. Each one has brought its own challenges which are hopefully mitigated within the script, but if not you can always get in touch and let me know.
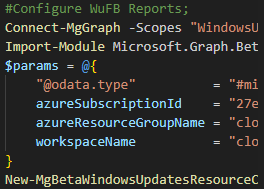
The Script
You will notice that most of this (the authentication part and most of the param block at least) are the same as my other script… But if its not broke why fix it? (Those famous last words!!!). Although this script does have an alternative run method, if you run it directly without the ClientID, ClientSecret and TenantID parameters it will install the Azure AD Powershell module and use a custom Function (Connect-AzAD_Token) to enable users to interact with a login Window if they do not wish to use Azure AD App Registrations with client secrets.
This Conditional Access script WILL ALWAYS REQUIRE A CUSTOM APP REGISTRATION. I’ve not put that in bold to be shouty but just to highlight it and stand out, as I was going around in circles for a couple of days trying to figure out why this one would not work!!!.
This script can be run from anywhere, as a user (If the using the command line parameters or if the AzureAD Module is installed already), as an Administrator or even as System. You could put this into an Automation Engine to do backups on a schedule if that is your desire but this would need to be done with an Azure App Registration.
The Pre-Reqs
Azure AD App Registration
To make the script work you will need an Azure App Registration with the following permissions for the Microsoft Graph API;
Backing Up **Conditional Access** Policies Only
For Direct Execution (Using the login box) you will need;
- Policy.Read.All (Delegate Permission)
Using the ClientID, ClientSecret and TenantID (Unattended) you will need;
- Policy.Read.All (Application Permission)
Importing **Conditional Access** Policies
For Direct Execution (Using the login box) you will need;
- Policy.Read.All (Delegate Permission)
- Policy.ReadWrite.ConditionalAccess (Delegate Permission)
- Application.Read.All (Delegate Permission)
Using the ClientID, ClientSecret and TenantID (Unattended) you will need;
- Policy.Read.All (Application Permission)
- Policy.ReadWrite.ConditionalAccess (ApplicationPermission)
- Application.Read.All (Application Permission)
If you are not executing the script directly, you will also need the Tenant ID and the account that the script will be running as will need permission to the Output folder for backups.
If your not sure how to create an Azure AD App Registration head over to one of my other posts by clicking HERE, Don’t forget to store your Client ID and Secret securely and also have it to hand for the rest of the post :D.
Redirect URI
For this one, there is a little bit more to do with the Azure AD Application. We are going to need to add a re-write URI for Authentication when using the Login Prompt (Delegated Permissions). If you do not have a Redirect URI or it is not the correct one you will recieve an error like below.

We need to add urn:ietf:wg:oauth:2.0:oob as a redirect URI for the application. To do so follow the below steps;
- Browse to your Azure AD Application Registration
- Click on Authntication located in the left pane
- Click Add a Platform
- Click Mobile and Desktop applications
- Copy and paste urn:ietf:wg:oauth:2.0:oob into the Redirect URI field
- Click Configure
This will enable the Authentication box to work with Conditional Access. Unfortunately I was unable to add these Permissions to the Microsoft Intune PowerShell Enterprise Application so I could have left this as a default ClientID for that in each tenant.
Executing the Script
Unattended with an Azure AD App Registration
You can run this script directly from a PowerShell console, using Task Scheduler or using a 3rd party automation product that supports Powershell.
The main thing we will go through here is just the parameters and then putting them all together from the command line, it’s really that simple.
For Backup Only
- Client ID: This is the Client ID for your Azure AD App
- ClientSecret: The Client Secret for the Azure AD App
- TenantID: Your Azure Tenant ID
- OutputFolder: Your desired Output folder
./Backup_Import_ConditionalAccessPolicies.ps1 -ClientID “” -ClientSecret “” -TenantID “” -OutputFolder “./YourServerBackups/ConditionalAccessPolicies”
For Importing Policies
- Client ID: This is the Client ID for your Azure AD App
- ClientSecret: The Client Secret for the Azure AD App
- TenantID: Your Azure Tenant ID
- Import: This is a switch parameter which states if your intention is to import or not
- ImportJSON: the path to your JSON file.
You will finally end up with something like this;
./Backup_Import_ConditionalAccessPolicies.ps1 -ClientID “” -ClientSecret “” -TenantID “” -Import -ImportJSON “./YourServerBackups/ConditionalAccessPolicies/ImportMe.JSON”
Direct Execution (With your Azure AD App Registration)
There is a slight change here from my previous posts as mentioned above in the Script section we need an Azure AD App registration for this one in any case. The fundamental difference here though is the permission type (Delegate) and it does not require a Secret and TenantID.
If you launch the script without the required -DelegateClientID parameter you will be prompted with a message saying you need to launch it with one. So for this direct execution you will need to launch the script like below;
For Backup
./Backup_Import_ConditionalAccessPolicies.ps1 -DelegateClientID “”
For Import
./Backup_Import_ConditionalAccessPolicies.ps1 -DelegateClientID “” -Import -ImportJSON “./YourServerBackups/ConditionalAccessPolicies/ImportMe.JSON”
You will then be prompted with a Microsoft Logon Window similar to the below.

Once you login the script will continue to run and then output the policy files in the same way it would using the App Registration.
If you add the -OutputFolder parameter you can change the destination of the base output folder. However if you are wishing to use the script to Import policies you can add the -Import and -ImportJSON parameters, If you specify the -Import parameter you must also specify the -ImportJSON parameter with a path to the JSON file (e.g. C:/ImportMe.json) otherwise the script will display a message that you did not specify the -ImportJSON Parameter.
You will notice that when you run the script, if the folder does not exist it will create it. It also put its into a dated folder in the yyyyMMdd_HH-mm-ss format leaving you with something like 20200914_11-52-22
Summary
This can also be useful if you are wanting to make a copy of your policies to assign to a test machine. All you will need to do is backup your current policies and amend the JSON file, If you find the displayName field in the JSON file and amend it and save the file you will be able to re-import this the same settings. All you then need to do is assign it.
I have tested this myself at the time of writing the post but if you come across any information you think may be wrong then please leave a comment.
I hope this is useful for your needs.
Categories
Tags

Backup and Import Conditional Access Policies
Why backup Conditional Access Policies?
Why would you need to back up something that runs in stored and hosted on Azure? Well there are numerous answers to this question really.
- If you make a change and you break something you can look back and analyse what it was
- You can make copies of the policy easily rather than having two windows side by side
- In case one is deleted… (Let’s hope this is never the case)
- To review the maturity of your policies (Lets say you started from ground zero and now have over 100 policy settings… Might be nice to review what you’ve done)
We also live in a world of change management and service improvement so there is always a need to make changes to policies and configurations. If you have or are moving from traditional group policy you will know that you can run an HTML report or a backup before you go ahead and make any changes.
Well when using Intune there was no way to export or backup your profiles or policies from the console… I have seen people taking screenshots of the pages as a backup of the policies which is far from an ideal scenario.
What if I told you there is a way you can back-up your configuration policies using the Microsoft Graph API?? Well it’s possible and it’s easier than you think.
This is part of a series of posts about backing up and importing policies and profiles, so if you feel like you’ve read this part before then you probably have.
Back when I wrote my first post about these (HERE) the script just backed up the policies/profiles, however over time they have grown into scripts that you can also use to re-import these policies/profile.
This one is the Third in the series, where we will focus on Conditional Access Policies. Each one has brought its own challenges which are hopefully mitigated within the script, but if not you can always get in touch and let me know.
The Script
You will notice that most of this (the authentication part and most of the param block at least) are the same as my other script… But if its not broke why fix it? (Those famous last words!!!). Although this script does have an alternative run method, if you run it directly without the ClientID, ClientSecret and TenantID parameters it will install the Azure AD Powershell module and use a custom Function (Connect-AzAD_Token) to enable users to interact with a login Window if they do not wish to use Azure AD App Registrations with client secrets.
This Conditional Access script WILL ALWAYS REQUIRE A CUSTOM APP REGISTRATION. I’ve not put that in bold to be shouty but just to highlight it and stand out, as I was going around in circles for a couple of days trying to figure out why this one would not work!!!.
This script can be run from anywhere, as a user (If the using the command line parameters or if the AzureAD Module is installed already), as an Administrator or even as System. You could put this into an Automation Engine to do backups on a schedule if that is your desire but this would need to be done with an Azure App Registration.
The Pre-Reqs
Azure AD App Registration
To make the script work you will need an Azure App Registration with the following permissions for the Microsoft Graph API;
Backing Up **Conditional Access** Policies Only
For Direct Execution (Using the login box) you will need;
- Policy.Read.All (Delegate Permission)
Using the ClientID, ClientSecret and TenantID (Unattended) you will need;
- Policy.Read.All (Application Permission)
Importing **Conditional Access** Policies
For Direct Execution (Using the login box) you will need;
- Policy.Read.All (Delegate Permission)
- Policy.ReadWrite.ConditionalAccess (Delegate Permission)
- Application.Read.All (Delegate Permission)
Using the ClientID, ClientSecret and TenantID (Unattended) you will need;
- Policy.Read.All (Application Permission)
- Policy.ReadWrite.ConditionalAccess (ApplicationPermission)
- Application.Read.All (Application Permission)
If you are not executing the script directly, you will also need the Tenant ID and the account that the script will be running as will need permission to the Output folder for backups.
If your not sure how to create an Azure AD App Registration head over to one of my other posts by clicking HERE, Don’t forget to store your Client ID and Secret securely and also have it to hand for the rest of the post :D.
Redirect URI
For this one, there is a little bit more to do with the Azure AD Application. We are going to need to add a re-write URI for Authentication when using the Login Prompt (Delegated Permissions). If you do not have a Redirect URI or it is not the correct one you will recieve an error like below.
We need to add urn:ietf:wg:oauth:2.0:oob as a redirect URI for the application. To do so follow the below steps;
- Browse to your Azure AD Application Registration
- Click on Authntication located in the left pane
- Click Add a Platform
- Click Mobile and Desktop applications
- Copy and paste urn:ietf:wg:oauth:2.0:oob into the Redirect URI field
- Click Configure
This will enable the Authentication box to work with Conditional Access. Unfortunately I was unable to add these Permissions to the Microsoft Intune PowerShell Enterprise Application so I could have left this as a default ClientID for that in each tenant.
Executing the Script
Unattended with an Azure AD App Registration
You can run this script directly from a PowerShell console, using Task Scheduler or using a 3rd party automation product that supports Powershell.
The main thing we will go through here is just the parameters and then putting them all together from the command line, it’s really that simple.
For Backup Only
- Client ID: This is the Client ID for your Azure AD App
- ClientSecret: The Client Secret for the Azure AD App
- TenantID: Your Azure Tenant ID
- OutputFolder: Your desired Output folder
./Backup_Import_ConditionalAccessPolicies.ps1 -ClientID “” -ClientSecret “” -TenantID “” -OutputFolder “./YourServerBackups/ConditionalAccessPolicies”
For Importing Policies
- Client ID: This is the Client ID for your Azure AD App
- ClientSecret: The Client Secret for the Azure AD App
- TenantID: Your Azure Tenant ID
- Import: This is a switch parameter which states if your intention is to import or not
- ImportJSON: the path to your JSON file.
You will finally end up with something like this;
./Backup_Import_ConditionalAccessPolicies.ps1 -ClientID “” -ClientSecret “” -TenantID “” -Import -ImportJSON “./YourServerBackups/ConditionalAccessPolicies/ImportMe.JSON”
Direct Execution (With your Azure AD App Registration)
There is a slight change here from my previous posts as mentioned above in the Script section we need an Azure AD App registration for this one in any case. The fundamental difference here though is the permission type (Delegate) and it does not require a Secret and TenantID.
If you launch the script without the required -DelegateClientID parameter you will be prompted with a message saying you need to launch it with one. So for this direct execution you will need to launch the script like below;
For Backup
./Backup_Import_ConditionalAccessPolicies.ps1 -DelegateClientID “”
For Import
./Backup_Import_ConditionalAccessPolicies.ps1 -DelegateClientID “” -Import -ImportJSON “./YourServerBackups/ConditionalAccessPolicies/ImportMe.JSON”
You will then be prompted with a Microsoft Logon Window similar to the below.
Once you login the script will continue to run and then output the policy files in the same way it would using the App Registration.
If you add the -OutputFolder parameter you can change the destination of the base output folder. However if you are wishing to use the script to Import policies you can add the -Import and -ImportJSON parameters, If you specify the -Import parameter you must also specify the -ImportJSON parameter with a path to the JSON file (e.g. C:/ImportMe.json) otherwise the script will display a message that you did not specify the -ImportJSON Parameter.
You will notice that when you run the script, if the folder does not exist it will create it. It also put its into a dated folder in the yyyyMMdd_HH-mm-ss format leaving you with something like 20200914_11-52-22
Summary
This can also be useful if you are wanting to make a copy of your policies to assign to a test machine. All you will need to do is backup your current policies and amend the JSON file, If you find the displayName field in the JSON file and amend it and save the file you will be able to re-import this the same settings. All you then need to do is assign it.
I have tested this myself at the time of writing the post but if you come across any information you think may be wrong then please leave a comment.
I hope this is useful for your needs.