Create a Microsoft Team with Graph API and PowerShell
Why use an API to create a Teams Channel?
Using API’s and Automation accounts help create a continuously repeatable process whilst minimising human error and providing a consistent experience. It has many purposes, should that be to provide a script to a managed client, create a team from a form submission, the list could go on, and If you’ve found this post by organic search, then it must be at least in some way what your are looking for.
So how do we do it?
This guide will focus on using PowerShell to call the Graph API using the Microsoft.Graph module. However, the key take away is that this can be achieve via alternative API calling methods.
What will we be deploying?
We will look at deploying a Microsoft Team, with an additional channel, whist also removing Tabs from the channels and adding custom tabs for Web Links.
Pre-requisite
- Microsoft.Graph PowerShell Module
- Teams Administrator (or equivalent/higher) privileges
Building up the channel Object
Before we can POST anything to the Graph API, we need to start by building up our Team and channels. In the drop down below, there is a sample of the `$params` object which will later be used to create a Team. We will be referencing back to this throughout this section.
So lets look at some of the main properties;
- “Te******@***ta.bind“ – This is teams template you want to base your channel on. This can be a custom channel, or an in-built one.
- CLICK HERE: Other Inbuilt Template Types
- CLICK HERE: For information on custom templates
- Visibility – You’re channel visibility, either public or private.
- DisplayName – The display name of the Team you want to create
- Description – A brief description of the purpose of this team.
- Channels – The channels you want to create within the Team.
There are other options within the object, which are comparable to their GUI counterparts, I have left them in the object to allow the ease of updating these values if you need to change them.
Channels
Let us explore the channel array a bit further, this is where you create additional channels within the team. This is also the section you will add in any custom tabs you may want to add as demonstrated within the object.
Each channel will be an object within the channel array, and as before, there are some basic properties like DisplayName and Description, then you have the IsFavouriteByDefault property, this is what controls if the channel is displayed or hidden upon creation based on a boolean input. Then you have Tabs, where you can add apps.
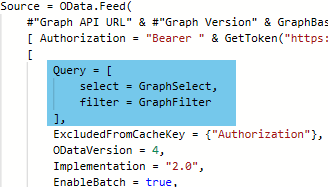
You can find the Apps available to add to this array by calling the TeamsApp API. An example query would be `GET https://graph.microsoft.com/beta/appCatalogs/teamsApps?$expand=appDefinitions($select=id,displayName,allowedInstallationScopes)`. Using this query you could find the app IDs.
My recommendation for this would be to export a template that already has the application within it and obtain the values you need to ensure you enrich the app properly with configurations, alternatively seek these configuration values from the app vendor.
All of the apps within thr array are defined as objects as with the channels. If we look at the below object as an , you can see the teams app is bound to a URL similar to the one above. Followed by a DisplayName and the Configuration for the App. In the below example I will be creating a Tab for the Microsoft Intune Console.
If you prefer to use the direct APIwith a JSON object from Graph Explorer or Postman you can use the following command to convert your object to JSON.
`$params | ConvertTo-Json -Depth 5`
NOTE: MAKE SURE YOU FILL OUT YOUR VARIABLES WHERE THEY ARE CALLED WITHIN THE OBJECT
OK, so now we’ve explored the channels, lets explore how we POST it to the Graph API with PowerShell.
Create the Team with PowerShell
One thing I found when creating the Team via the Graph API, is that you will only receive a success status code when posting the object to the Graph. This is because the API is more like an orchestrator, which means we need to do some additional bits to track the creation.
This is more of a requirement if you want to amend the team after creation, for things like removing the Wiki tab etc, which will all be described in the following sections.
As mentioned in the Pre-requisites, we will need the Microsoft.Graph PowerShell module, you can install this by running `Install-Module -Name Microsoft.Graph -AllowClobber` in an elevated shell, or append with `-Scope CurrentUser` from a non-elevated prompt.
In the above drop-down you will see an example script, which contains the same object we have been working on previously in this post, so if you have started making your own object, simply replace the object in the example script.
In this section we will focus on everything after the object and then how the script can be invoked from the command line using parameters.
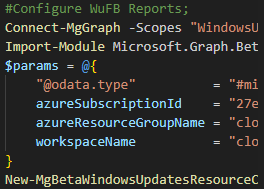
The first thing that we need to do is authenticate to the Microsoft Graph, we use the `Connect-MgGraph` command for this when using direct execution, for automation scenarios, please review the Microsoft Documentation.
Once we have authenticated, We use the `Invoke-MGGraphRequest` to POST the param object to the Graph API. In this example, we assign this call to the `$Team` variable so we can then track the team creation.
After the initial POST to the API, the example then use a while loop to track the creation of the team. As mentioned in the tip at the start of this section, the API call to create the team is more of an orchestration API which is the reason we need to go to the additional effort to track the progress of creation.
Once the operation has succeeded, you can then layer on additional customisations, such as removing the Wiki tab as shown in the example below.
Conclusion
As mentioned at the start, automation is the key to consistency when performing repetitive tasks. Hopefully this post can aid with the understanding of how to achieve and automated approach to creating Teams and Channels within your organisation.
Resources
Categories
Tags

Create a Microsoft Team with Graph API and PowerShell
Why use an API to create a Teams Channel?
Using API’s and Automation accounts help create a continuously repeatable process whilst minimising human error and providing a consistent experience. It has many purposes, should that be to provide a script to a managed client, create a team from a form submission, the list could go on, and If you’ve found this post by organic search, then it must be at least in some way what your are looking for.
So how do we do it?
This guide will focus on using PowerShell to call the Graph API using the Microsoft.Graph module. However, the key take away is that this can be achieve via alternative API calling methods.
What will we be deploying?
We will look at deploying a Microsoft Team, with an additional channel, whist also removing Tabs from the channels and adding custom tabs for Web Links.
Pre-requisite
- Microsoft.Graph PowerShell Module
- Teams Administrator (or equivalent/higher) privileges
Building up the channel Object
Before we can POST anything to the Graph API, we need to start by building up our Team and channels. In the drop down below, there is a sample of the `$params` object which will later be used to create a Team. We will be referencing back to this throughout this section.
So lets look at some of the main properties;
- “Te******@***ta.bind“ – This is teams template you want to base your channel on. This can be a custom channel, or an in-built one.
- CLICK HERE: Other Inbuilt Template Types
- CLICK HERE: For information on custom templates
- Visibility – You’re channel visibility, either public or private.
- DisplayName – The display name of the Team you want to create
- Description – A brief description of the purpose of this team.
- Channels – The channels you want to create within the Team.
There are other options within the object, which are comparable to their GUI counterparts, I have left them in the object to allow the ease of updating these values if you need to change them.
Channels
Let us explore the channel array a bit further, this is where you create additional channels within the team. This is also the section you will add in any custom tabs you may want to add as demonstrated within the object.
Each channel will be an object within the channel array, and as before, there are some basic properties like DisplayName and Description, then you have the IsFavouriteByDefault property, this is what controls if the channel is displayed or hidden upon creation based on a boolean input. Then you have Tabs, where you can add apps.
You can find the Apps available to add to this array by calling the TeamsApp API. An example query would be `GET https://graph.microsoft.com/beta/appCatalogs/teamsApps?$expand=appDefinitions($select=id,displayName,allowedInstallationScopes)`. Using this query you could find the app IDs.
My recommendation for this would be to export a template that already has the application within it and obtain the values you need to ensure you enrich the app properly with configurations, alternatively seek these configuration values from the app vendor.
All of the apps within thr array are defined as objects as with the channels. If we look at the below object as an , you can see the teams app is bound to a URL similar to the one above. Followed by a DisplayName and the Configuration for the App. In the below example I will be creating a Tab for the Microsoft Intune Console.
If you prefer to use the direct APIwith a JSON object from Graph Explorer or Postman you can use the following command to convert your object to JSON.
`$params | ConvertTo-Json -Depth 5`
NOTE: MAKE SURE YOU FILL OUT YOUR VARIABLES WHERE THEY ARE CALLED WITHIN THE OBJECT
OK, so now we’ve explored the channels, lets explore how we POST it to the Graph API with PowerShell.
Create the Team with PowerShell
One thing I found when creating the Team via the Graph API, is that you will only receive a success status code when posting the object to the Graph. This is because the API is more like an orchestrator, which means we need to do some additional bits to track the creation.
This is more of a requirement if you want to amend the team after creation, for things like removing the Wiki tab etc, which will all be described in the following sections.
As mentioned in the Pre-requisites, we will need the Microsoft.Graph PowerShell module, you can install this by running `Install-Module -Name Microsoft.Graph -AllowClobber` in an elevated shell, or append with `-Scope CurrentUser` from a non-elevated prompt.
In the above drop-down you will see an example script, which contains the same object we have been working on previously in this post, so if you have started making your own object, simply replace the object in the example script.
In this section we will focus on everything after the object and then how the script can be invoked from the command line using parameters.
The first thing that we need to do is authenticate to the Microsoft Graph, we use the `Connect-MgGraph` command for this when using direct execution, for automation scenarios, please review the Microsoft Documentation.
Once we have authenticated, We use the `Invoke-MGGraphRequest` to POST the param object to the Graph API. In this example, we assign this call to the `$Team` variable so we can then track the team creation.
After the initial POST to the API, the example then use a while loop to track the creation of the team. As mentioned in the tip at the start of this section, the API call to create the team is more of an orchestration API which is the reason we need to go to the additional effort to track the progress of creation.
Once the operation has succeeded, you can then layer on additional customisations, such as removing the Wiki tab as shown in the example below.
Conclusion
As mentioned at the start, automation is the key to consistency when performing repetitive tasks. Hopefully this post can aid with the understanding of how to achieve and automated approach to creating Teams and Channels within your organisation.