Creating Intune Win32 Apps
Win32 Apps, What Are they?
If you’re familiar with Configuration Manager/MEMCM then think of these files as your source directory, the difference being you are effectively zipping it up and then uploading to Intune.
According to Microsoft, if you decide to use Win32 Apps, it is advised that you use these exclusively and NOT ‘Mix and Match’ these with Line of Business applications when using Autopilot (See Microsoft Doc link below).
What content can be in a Win32 App Package?
The answer to that is well pretty much anything to a certain extent. These files are just proprietary files for Intune however under the hood they are just zip files that are then hashed and encoded.
What uses are there for Win32 Apps?
Well put, to Install apps. Now don’t be thrown by the 32 as these are not just for 32-bit apps, they can be used for any app.
You can use Win32 apps to just launch PowerShell scripts, Batch scripts, VBScripts etc. as long as you have a detection method if they succeed.
Mainly they are used for installing custom app packages like Greenshot, Citrix, PSADT Apps etc.
Microsoft Doc: Win32 app management in Microsoft Intune | Microsoft Docs
Package Creation Methods
IntuneWinAppUtil Application
The first method is creating a packaged using the GUI (Well kind of GUI) that is mentioned in the Microsoft Doc. Yiu can grab the utility from the below link;
If you clone/download the files, and extract them to a suitable location to work with.
Let’s get started. The below works on the assumption you have your files in a folder with noting other than those required for the app. (You don’t want to be uploading your entire desktop do you :P)
- Launch the IntuneWinAppUtil.exe
- Type/Paste your Source Directory (e.g. C:/Win 32 Apps/7-Zip), hit Enter.
- Type/Paste you setup file name (e.g. 7z2002-x64.exe or MyScript.ps1), hit Enter
- Type/Paste your Output Directory (e.g. C:/Win 32 Apps), hit Enter.
- When prompted about catalogue files type N unless you are deploying to Windows S Mode, hit Enter
The window will automatically close when your .intunewin file is finished if you head over your output folder you will be able to get your file for upload.
PowerShell
PowerShell Gallery | IntuneWin32App 1.2.0
For you command-line gurus and script lovers out there, you will be pleased to know that there is a PowerShell module for bundling these your apps up, you can even go a step further and import them via a script, but we will save that for another post :D.
You can install the module using the following command;
Using the packages with Intune
Head over to Microsoft Intune admin center (Intune) to to get started
- Select Apps from the navigation pane
- Select All Apps, Click Add
- Select App type Other>Windows app (Win32), Click Select
- Click Select app package file, Click the Blue Folder icon to open the browse windows
- Select the .intunewin file you have created, Click Open and then click OK
- Fill out the Name and Publisher mandatory fields, and any other fields you desire
- Upload an icon if you desire, I would recommend doing this if you are deploying this to users via the Company Portal
- Click Next
- Enter your install command (e.g. 7z2002-x64.exe /S)
- Enter your uninstall command (e.g. “C:Program Files7-ZipUninstall.exe” /S)
- Select your install behaviour, if this is a machine wide installation you will need to select System, otherwise select User if this is installing to the user profile
- Select your desired restart behaviour, Adding custom return codes if required
- Click Next
- Complete your OS Requirements, At a minimum you need to specify the Architecture (x86/x64) and the minimum OS Version (e.g. 1607/1703 etc.)
- Click Next
- For Detection rules, See the Detection Rules section below, Once complete click Next
- Add any dependent Intune Apps you may require, Click Next
- Assign the application to your desired group, just as a NOTE if you want to display the app in the company portal, it MUST be assigned to a group containing that user. Required Assignments will force the app to install, whereas Available will show this in the Company Portal. Click Next
- Click Create
That is your app finished and deploying, it is worth noting it may take 15/20 minutes to be available on the device, the device must also perform a sync to check for the app.
Detection Rules
Detection rules have 4 options, you can use a Custom Detection Script, Registry, File(Folder) and MSI, lets look at them in a little bit more detail.
When you first reach the Detection Rule Screen you will have a single Drop-Down box with two options, Use a custom detection script and Manually configure detection rules. File, Registry and MSI are all available under the Manual option, it is worth noting that you can can mix and match these rules, however there are considered AND methods. If you are looking to do a AND/OR detection you will need to use a custom PowerShell Script.
We will dive into all of the options below.
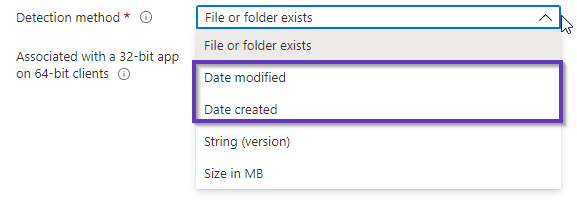
File

As you can see above using this detection method is fairly straight forward, however it can get a bit messy if you use the Date Created/Modified options.
Lets put a rule together.
- Rule Type – File
- Path – “YourPath” (e.g. C:Program Files7-Zip)
- File or Folder – “YourFileFolder” (e.g. 7z.exe)
- Detection Method – File or Folder Exists
- Associated with a 32-bit app on a 64-bit client, No.
Now that rule is very quick and simple, as mentioned you can use the date modified or created option, and that would look something like below.
- Rule Type – File
- Path – “YourPath” (e.g. C:Program Files7-Zip)
- File or Folder – “YourFileFolder” (e.g. 7z.exe)
- Detection Method – Date Modified
- Operator, select the option that you wish to validate against (e.g. Equals, Greater than etc.)
- Select the date using the date picker and enter the time using the 12 hour format
- Associated with a 32-bit app on a 64-bit client, No.
Registry
The registry option is fairly straight forward, and is the most likely option you are going to select if you are just installing a simple application and just want to check that the program itself exists. Again for the detection method you have various options, for this example we will just use Key Exists
- Rule Type – Registry
- Key Path – "Path to key" (e.g. HKEY_LOCAL_MACHINE/SOFTWARE/Microsoft/Windows/CurrentVersion/Uninstall/7-Zip)
- Value Name – "Value Name" (e.g. DisplayVersion)
- Detection Method – File or Folder Exists
- Associated with a 32-bit app on a 64-bit client, No.
MSI
MSI detections are quick and easy if you are installing an MSI application, all you need is the GUID, for the 7-zip app this is not applicable however below is a basic example. You can also perform version checks on the MSI apps.
- Rule Type – MSI
- MSI Product Code – "Product GUID" (e.g. )
- MSI product version check – Yes
- Select your operator (e.g. Equals, Greater than etc.)
- Value – Product Version (e.g. 20.02)
Detection Script
For me, this is the most favorable option, but I love to script :D. But that aside you can check multiple actions, the only thing you need to do is return any value other than Null for the detection to pass. For example the below script checks for the registry value and also that the file exists, if they do it will return a True value, else it will return nothing.
You will need to have the file save and ready to be upload to Intune, The above is written in PowerShell so will need a .ps1 extension. To use this method follow the below steps.
- Rule format – Use custom detection script
- Script file – Upload yours using the blue folder icon
- Run Script as a 32-bit process on 64-bit clients – No (This is entirely your choice again but for this example it is not required)
- Enforce script signature check and run script silently – No
That covers the basics all of the detection methods, if you have any further questions please reach out or review the Microsoft Docs.
3rd Party/Community Tools & Blogs
Here are some of the 3rd Party and Community Tools and Blogs that I have found useful and they may help you in you hour of need!!
Syst & Deploy – Intune Win32 App Tool
This is a great tool to create and extract/decode Win32 apps if you prefer a GUI to creating your intunewin files, this tool also has a feature to decode the packages you already have incase you loose the source files but have the intunewin file.
Intune Win32app tool – Create and Extract Intunewin | Syst & Deploy (systanddeploy.com)
Oliver Kieselbach – How to decode Win32 App Packages
This is a great guide and it can truly help pull you out of the gutter if you have lost all of your intunewin files, although its not straight forward to get them back (Not Oliver’s Fault) this guid provides you an in-depth guide on how to retrieve the intunewin packages. Truly worth a read and Kudos to Oliver for giving us this gift.
How to decode Intune Win32 App Packages – Modern IT – Cloud – Workplace (oliverkieselbach.com)
Categories
Tags

Creating Intune Win32 Apps
Win32 Apps, What Are they?
If you’re familiar with Configuration Manager/MEMCM then think of these files as your source directory, the difference being you are effectively zipping it up and then uploading to Intune.
According to Microsoft, if you decide to use Win32 Apps, it is advised that you use these exclusively and NOT ‘Mix and Match’ these with Line of Business applications when using Autopilot (See Microsoft Doc link below).
What content can be in a Win32 App Package?
The answer to that is well pretty much anything to a certain extent. These files are just proprietary files for Intune however under the hood they are just zip files that are then hashed and encoded.
What uses are there for Win32 Apps?
Well put, to Install apps. Now don’t be thrown by the 32 as these are not just for 32-bit apps, they can be used for any app.
You can use Win32 apps to just launch PowerShell scripts, Batch scripts, VBScripts etc. as long as you have a detection method if they succeed.
Mainly they are used for installing custom app packages like Greenshot, Citrix, PSADT Apps etc.
Microsoft Doc: Win32 app management in Microsoft Intune | Microsoft Docs
Package Creation Methods
IntuneWinAppUtil Application
The first method is creating a packaged using the GUI (Well kind of GUI) that is mentioned in the Microsoft Doc. Yiu can grab the utility from the below link;
If you clone/download the files, and extract them to a suitable location to work with.
Let’s get started. The below works on the assumption you have your files in a folder with noting other than those required for the app. (You don’t want to be uploading your entire desktop do you :P)
- Launch the IntuneWinAppUtil.exe
- Type/Paste your Source Directory (e.g. C:/Win 32 Apps/7-Zip), hit Enter.
- Type/Paste you setup file name (e.g. 7z2002-x64.exe or MyScript.ps1), hit Enter
- Type/Paste your Output Directory (e.g. C:/Win 32 Apps), hit Enter.
- When prompted about catalogue files type N unless you are deploying to Windows S Mode, hit Enter
The window will automatically close when your .intunewin file is finished if you head over your output folder you will be able to get your file for upload.
PowerShell
PowerShell Gallery | IntuneWin32App 1.2.0
For you command-line gurus and script lovers out there, you will be pleased to know that there is a PowerShell module for bundling these your apps up, you can even go a step further and import them via a script, but we will save that for another post :D.
You can install the module using the following command;
Using the packages with Intune
Head over to Microsoft Intune admin center (Intune) to to get started
- Select Apps from the navigation pane
- Select All Apps, Click Add
- Select App type Other>Windows app (Win32), Click Select
- Click Select app package file, Click the Blue Folder icon to open the browse windows
- Select the .intunewin file you have created, Click Open and then click OK
- Fill out the Name and Publisher mandatory fields, and any other fields you desire
- Upload an icon if you desire, I would recommend doing this if you are deploying this to users via the Company Portal
- Click Next
- Enter your install command (e.g. 7z2002-x64.exe /S)
- Enter your uninstall command (e.g. “C:Program Files7-ZipUninstall.exe” /S)
- Select your install behaviour, if this is a machine wide installation you will need to select System, otherwise select User if this is installing to the user profile
- Select your desired restart behaviour, Adding custom return codes if required
- Click Next
- Complete your OS Requirements, At a minimum you need to specify the Architecture (x86/x64) and the minimum OS Version (e.g. 1607/1703 etc.)
- Click Next
- For Detection rules, See the Detection Rules section below, Once complete click Next
- Add any dependent Intune Apps you may require, Click Next
- Assign the application to your desired group, just as a NOTE if you want to display the app in the company portal, it MUST be assigned to a group containing that user. Required Assignments will force the app to install, whereas Available will show this in the Company Portal. Click Next
- Click Create
That is your app finished and deploying, it is worth noting it may take 15/20 minutes to be available on the device, the device must also perform a sync to check for the app.
Detection Rules
Detection rules have 4 options, you can use a Custom Detection Script, Registry, File(Folder) and MSI, lets look at them in a little bit more detail.
When you first reach the Detection Rule Screen you will have a single Drop-Down box with two options, Use a custom detection script and Manually configure detection rules. File, Registry and MSI are all available under the Manual option, it is worth noting that you can can mix and match these rules, however there are considered AND methods. If you are looking to do a AND/OR detection you will need to use a custom PowerShell Script.
We will dive into all of the options below.
File
As you can see above using this detection method is fairly straight forward, however it can get a bit messy if you use the Date Created/Modified options.
Lets put a rule together.
- Rule Type – File
- Path – “YourPath” (e.g. C:Program Files7-Zip)
- File or Folder – “YourFileFolder” (e.g. 7z.exe)
- Detection Method – File or Folder Exists
- Associated with a 32-bit app on a 64-bit client, No.
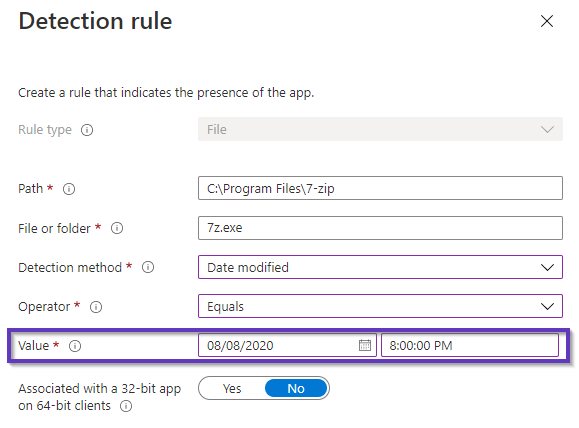
Now that rule is very quick and simple, as mentioned you can use the date modified or created option, and that would look something like below.
- Rule Type – File
- Path – “YourPath” (e.g. C:Program Files7-Zip)
- File or Folder – “YourFileFolder” (e.g. 7z.exe)
- Detection Method – Date Modified
- Operator, select the option that you wish to validate against (e.g. Equals, Greater than etc.)
- Select the date using the date picker and enter the time using the 12 hour format
- Associated with a 32-bit app on a 64-bit client, No.
Registry
The registry option is fairly straight forward, and is the most likely option you are going to select if you are just installing a simple application and just want to check that the program itself exists. Again for the detection method you have various options, for this example we will just use Key Exists
- Rule Type – Registry
- Key Path – "Path to key" (e.g. HKEY_LOCAL_MACHINE/SOFTWARE/Microsoft/Windows/CurrentVersion/Uninstall/7-Zip)
- Value Name – "Value Name" (e.g. DisplayVersion)
- Detection Method – File or Folder Exists
- Associated with a 32-bit app on a 64-bit client, No.
MSI
MSI detections are quick and easy if you are installing an MSI application, all you need is the GUID, for the 7-zip app this is not applicable however below is a basic example. You can also perform version checks on the MSI apps.
- Rule Type – MSI
- MSI Product Code – "Product GUID" (e.g. )
- MSI product version check – Yes
- Select your operator (e.g. Equals, Greater than etc.)
- Value – Product Version (e.g. 20.02)
Detection Script
For me, this is the most favorable option, but I love to script :D. But that aside you can check multiple actions, the only thing you need to do is return any value other than Null for the detection to pass. For example the below script checks for the registry value and also that the file exists, if they do it will return a True value, else it will return nothing.
You will need to have the file save and ready to be upload to Intune, The above is written in PowerShell so will need a .ps1 extension. To use this method follow the below steps.
- Rule format – Use custom detection script
- Script file – Upload yours using the blue folder icon
- Run Script as a 32-bit process on 64-bit clients – No (This is entirely your choice again but for this example it is not required)
- Enforce script signature check and run script silently – No
That covers the basics all of the detection methods, if you have any further questions please reach out or review the Microsoft Docs.
3rd Party/Community Tools & Blogs
Here are some of the 3rd Party and Community Tools and Blogs that I have found useful and they may help you in you hour of need!!
Syst & Deploy – Intune Win32 App Tool
This is a great tool to create and extract/decode Win32 apps if you prefer a GUI to creating your intunewin files, this tool also has a feature to decode the packages you already have incase you loose the source files but have the intunewin file.
Intune Win32app tool – Create and Extract Intunewin | Syst & Deploy (systanddeploy.com)
Oliver Kieselbach – How to decode Win32 App Packages
This is a great guide and it can truly help pull you out of the gutter if you have lost all of your intunewin files, although its not straight forward to get them back (Not Oliver’s Fault) this guid provides you an in-depth guide on how to retrieve the intunewin packages. Truly worth a read and Kudos to Oliver for giving us this gift.
How to decode Intune Win32 App Packages – Modern IT – Cloud – Workplace (oliverkieselbach.com)