Driver Management via Graph API and PowerShell
Microsoft have now released the Driver and Firmware Update management via the Graph API to the public!! This is one small step for some, but a giant leap in terms of the management of Drivers and Firmware using the Windows Update for Business Deployment Service (WUfB DS).
Many of you may have been anticipating this for a while as there has been various posts about it like the Tech Community Post from March 2021.
While the solution isn’t yet baked into Intune, it is on the horizon and anticipated to land in preview some time this year (but don’t hold me to it!). The Driver and Firmware team though are committed to delivering the solution components via WUfB DS for organisations and SMBs to start to take control of their environments.
The solution may only be configurable via the Graph API, however, the product team behind the solution have delivered an application that can be used to drive this in a GUI format, take a look at my VLOG Post to find out how to configure this.
Without further ado though, let take a look at how we can interact with the service with the Graph API and PowerShell.
Prerequisites
- Permissions to connect to the Graph API with the following scopes
- WindowsUpdates.ReadWrite.All
- Permission to view DeviceIDs in Azure AD
- Microsoft.Graph PowerShell Module
Connecting to the Graph API
Connecting via this module could not be easier, follow the below steps after ensuring the Microsoft.Graph module is installed.;
- Launch a PowerShell prompt
- Enter `Connect-MgGraph -Scopes WindowsUpdates.ReadWrite.All -ContextScope Process`, hit Enter
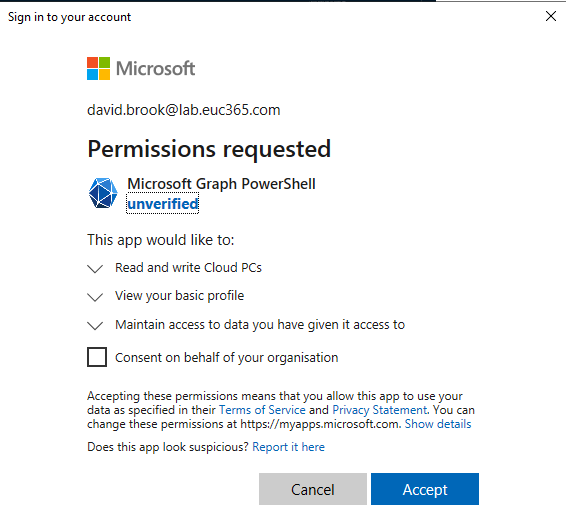
- Sign in, If not already consented, you will be prompted with an image like the below. You can choose to grant for yourself or your organisation if you have the permissions.
Microsoft Graph Profile Selection
The first thing we need to do before running any commands is call `Select-MgProfile -Name beta` to ensure we are using the Beta endpoint of the Microsoft Graph.
Managing Update Policies
So before we get to looking at the graph calls and creating policies, it is important to know that each Update Policy has an Update Audience which holds the Azure AD DeviceID. Each device, then also needs to be enrolled into the driver updateCategory.
Listing Update Policies
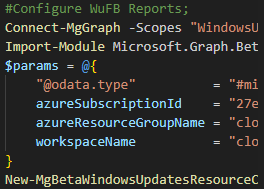
As mentioned in the note at the start of this section, there are no policy names stored in the API, so knowing the ID’s for the policies is imperative if you wish to undertake certain operations on a specific policy. For me, I store these in a hash table and in my IDE like follows;
This not only helps me understand which ID I am interacting with, but it allows me to utilise this for some mapping to audiences later down the line.
To list all of the policies within your environment, you can run `(Invoke-MgGraphRequest -Method GET -Uri “https://graph.microsoft.com/beta/admin/windows/updates/updatePolicies”).Value` which will return something like the following;
You can also call the policy directly if you know the ID by running `(Invoke-MgGraphRequest -Method GET -Uri “https://graph.microsoft.com/beta/admin/windows/updates/updatePolicies(‘<GUID>’)”).Value`, but replacing the GUID placeholder.
Listing Deployment Audience
Now that’s great, we can see the policies, but what is the deployment audience you speak of? Well let look at that. If you re-run the command above but with a few changes as follow you will see the deployment audience id.
Once you have the deployment audience ID, you can see the members of the audience by running `(Invoke-MgGraphRequest -Method GET -Uri “https://graph.microsoft.com/beta/admin/windows/updates/deploymentAudiences(‘GUID’)/members”).Value` by replacing the GUID placeholder with the id, which will return something like the below;
These ID’s relate to the Azure AD DeviceID property, if you further expand one of the values using `(Invoke-MgGraphRequest -Method GET -Uri “https://graph.microsoft.com/beta/admin/windows/updates/deploymentAudiences(‘8f636944-xxxx-xxxx-xxxx-a8abd4179687’)/members”).Value[0].enrollments` you will see the device is on-boarded for Driver management.
Ok, so now we’ve seen them listed, lets look how to conceptually create a policy from the ground up.
Creating an Update Policy
At the start of the Managing Update Policies section we mentioned the fact that each update policy requires an audience right? Well you cannot create a policy without an audience, so that is the first item on the Agenda.
Creating an Update Audience
You CAN NOT add members to an audience during it’s creation, this has to be done once created.
Creating an Audience is easy, it doesn’t require a post body as such, just a blank JSON object. In the below example we are going to create this and assign it to a variable that will be used in other parts the process.
Adding Members to the policy
The reccomended device limit is 2000 when using the Graph API.
Now we have our audience, you will want to add devices right? for this you will need a list of your device IDs in an object as below and then make the post request to add the members to the audience.
Ok, we are kind of close, but as of yet, no cigar. There are two ways to enrol your devices, Implicitly or Explicitly. You can create your update policies to Implicitly enroll device, however, for a larger number of devices (more likely during initial on-boarding) the longer this will take. You also have to bear in mind, this is a global service, so if everyone relies on implicit enrolment, then the slower your devices will be enrolled.
It is recommended, that devices are Explicitly enrolled as per the Explicitly Enrolling Devices.
Explicitly Enrolling Devices
While there isn’t a limit on the amount of devices you can post, the more devices you add, the longer it will take to complete the request.
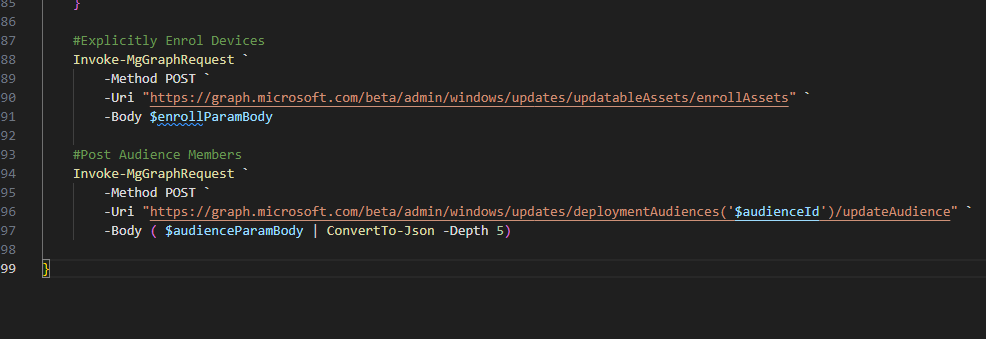
Enrolling a device, is somewhat similar to the adding members, you need an object with you devices in to be used as the body of the Graph call. A sample of this object would look like the following snippet, with the invoked call following .
Once enrolled, you can review the enrolment configuration as per the end of the Listing Deployment Audience section.
Creating an update policy
There are two types of policies to create, Manual and Automatic. So in the drop-down’s below there are code snippets that will create the policies for you
There are a couple of properties that are worth noting.
- autoEnrollmentUpdateCategories – This array allows you to specify auto enrolment into the driver service, meaning if you forget to manually enrol them, it will take care of it for you, albeit slower.
- durationBeforeDeploymentStart – This property specifies the deferral in an ISO8601 format, e.g P1D = 1 Day, PT2H30M = 2 hours and 30 Minutes
You can also dig further into these setting in the Graph API Documentation.
Listing Applicable Content
Now we have our policies, let look at how we see the applicable content for devices in an deployment audience. We will use the same audience we created earlier so we will continue to use the `$daAudience` variable.
To list the applicable content, you can run `(Invoke-MgGraphRequest -Method GET -Uri “https://graph.microsoft.com/beta/admin/windows/updates/deploymentAudiences/$($daAudience.id)/applicableContent”).value` and it will return all applicable content, with their respective applicable device ids. You can further expand into one of these values by appending either `.value[0].catalogentry` or `.value[0].matchedDevices` in place of the .value.
Manually Approving Driver Content
While I am writing this up for visibility, I would highly recommend standing up a machine to host the GUI with the configuration as required.
To manually approve the driver content, you will first need to find the catalogID of the desired update. This will take us on a journey back through the eco system, firstly finding the policy you want to review, followed by locating the audience id, and then reviewing the applicable content manually, and noting the catalogEntry id.
I wont walk through the whole process, as they are stepped out along the way of this article, but I will summarise the order below.
- Locate the Policy
- Locate the audience id
- Review the Applicable Content
- Note the catalogEntry id
Once you have done the above, you can compile another object as per below to approve the content, replacing the CatalogEntryID and UpdatePolicyID placeholders with the correct values.
Closing Thoughts
It has been a long time in the making, but gosh, its going to help so many organisations, and in the future it will be a must have implementation. But for now, lets feed back to the Microsoft Team and get this service in use to ensure we can build a brighter and better future for device management.
Time to sign off on this one now, We’ve covered a lot in this article, and there is surely more to come. I always love hearing from people, so please comment, share and feedback on the article :).
Categories
Tags

Driver Management via Graph API and PowerShell
Microsoft have now released the Driver and Firmware Update management via the Graph API to the public!! This is one small step for some, but a giant leap in terms of the management of Drivers and Firmware using the Windows Update for Business Deployment Service (WUfB DS).
Many of you may have been anticipating this for a while as there has been various posts about it like the Tech Community Post from March 2021.
While the solution isn’t yet baked into Intune, it is on the horizon and anticipated to land in preview some time this year (but don’t hold me to it!). The Driver and Firmware team though are committed to delivering the solution components via WUfB DS for organisations and SMBs to start to take control of their environments.
The solution may only be configurable via the Graph API, however, the product team behind the solution have delivered an application that can be used to drive this in a GUI format, take a look at my VLOG Post to find out how to configure this.
Without further ado though, let take a look at how we can interact with the service with the Graph API and PowerShell.
Prerequisites
- Permissions to connect to the Graph API with the following scopes
- WindowsUpdates.ReadWrite.All
- Permission to view DeviceIDs in Azure AD
- Microsoft.Graph PowerShell Module
Connecting to the Graph API
Connecting via this module could not be easier, follow the below steps after ensuring the Microsoft.Graph module is installed.;
- Launch a PowerShell prompt
- Enter `Connect-MgGraph -Scopes WindowsUpdates.ReadWrite.All -ContextScope Process`, hit Enter
- Sign in, If not already consented, you will be prompted with an image like the below. You can choose to grant for yourself or your organisation if you have the permissions.
Microsoft Graph Profile Selection
The first thing we need to do before running any commands is call `Select-MgProfile -Name beta` to ensure we are using the Beta endpoint of the Microsoft Graph.
Managing Update Policies
So before we get to looking at the graph calls and creating policies, it is important to know that each Update Policy has an Update Audience which holds the Azure AD DeviceID. Each device, then also needs to be enrolled into the driver updateCategory.
Listing Update Policies
As mentioned in the note at the start of this section, there are no policy names stored in the API, so knowing the ID’s for the policies is imperative if you wish to undertake certain operations on a specific policy. For me, I store these in a hash table and in my IDE like follows;
This not only helps me understand which ID I am interacting with, but it allows me to utilise this for some mapping to audiences later down the line.
To list all of the policies within your environment, you can run `(Invoke-MgGraphRequest -Method GET -Uri “https://graph.microsoft.com/beta/admin/windows/updates/updatePolicies”).Value` which will return something like the following;
You can also call the policy directly if you know the ID by running `(Invoke-MgGraphRequest -Method GET -Uri “https://graph.microsoft.com/beta/admin/windows/updates/updatePolicies(‘<GUID>’)”).Value`, but replacing the GUID placeholder.
Listing Deployment Audience
Now that’s great, we can see the policies, but what is the deployment audience you speak of? Well let look at that. If you re-run the command above but with a few changes as follow you will see the deployment audience id.
Once you have the deployment audience ID, you can see the members of the audience by running `(Invoke-MgGraphRequest -Method GET -Uri “https://graph.microsoft.com/beta/admin/windows/updates/deploymentAudiences(‘GUID’)/members”).Value` by replacing the GUID placeholder with the id, which will return something like the below;
These ID’s relate to the Azure AD DeviceID property, if you further expand one of the values using `(Invoke-MgGraphRequest -Method GET -Uri “https://graph.microsoft.com/beta/admin/windows/updates/deploymentAudiences(‘8f636944-xxxx-xxxx-xxxx-a8abd4179687’)/members”).Value[0].enrollments` you will see the device is on-boarded for Driver management.
Ok, so now we’ve seen them listed, lets look how to conceptually create a policy from the ground up.
Creating an Update Policy
At the start of the Managing Update Policies section we mentioned the fact that each update policy requires an audience right? Well you cannot create a policy without an audience, so that is the first item on the Agenda.
Creating an Update Audience
You CAN NOT add members to an audience during it’s creation, this has to be done once created.
Creating an Audience is easy, it doesn’t require a post body as such, just a blank JSON object. In the below example we are going to create this and assign it to a variable that will be used in other parts the process.
Adding Members to the policy
The reccomended device limit is 2000 when using the Graph API.
Now we have our audience, you will want to add devices right? for this you will need a list of your device IDs in an object as below and then make the post request to add the members to the audience.
Ok, we are kind of close, but as of yet, no cigar. There are two ways to enrol your devices, Implicitly or Explicitly. You can create your update policies to Implicitly enroll device, however, for a larger number of devices (more likely during initial on-boarding) the longer this will take. You also have to bear in mind, this is a global service, so if everyone relies on implicit enrolment, then the slower your devices will be enrolled.
It is recommended, that devices are Explicitly enrolled as per the Explicitly Enrolling Devices.
Explicitly Enrolling Devices
While there isn’t a limit on the amount of devices you can post, the more devices you add, the longer it will take to complete the request.
Enrolling a device, is somewhat similar to the adding members, you need an object with you devices in to be used as the body of the Graph call. A sample of this object would look like the following snippet, with the invoked call following .
Once enrolled, you can review the enrolment configuration as per the end of the Listing Deployment Audience section.
Creating an update policy
There are two types of policies to create, Manual and Automatic. So in the drop-down’s below there are code snippets that will create the policies for you
There are a couple of properties that are worth noting.
- autoEnrollmentUpdateCategories – This array allows you to specify auto enrolment into the driver service, meaning if you forget to manually enrol them, it will take care of it for you, albeit slower.
- durationBeforeDeploymentStart – This property specifies the deferral in an ISO8601 format, e.g P1D = 1 Day, PT2H30M = 2 hours and 30 Minutes
You can also dig further into these setting in the Graph API Documentation.
Listing Applicable Content
Now we have our policies, let look at how we see the applicable content for devices in an deployment audience. We will use the same audience we created earlier so we will continue to use the `$daAudience` variable.
To list the applicable content, you can run `(Invoke-MgGraphRequest -Method GET -Uri “https://graph.microsoft.com/beta/admin/windows/updates/deploymentAudiences/$($daAudience.id)/applicableContent”).value` and it will return all applicable content, with their respective applicable device ids. You can further expand into one of these values by appending either `.value[0].catalogentry` or `.value[0].matchedDevices` in place of the .value.
Manually Approving Driver Content
While I am writing this up for visibility, I would highly recommend standing up a machine to host the GUI with the configuration as required.
To manually approve the driver content, you will first need to find the catalogID of the desired update. This will take us on a journey back through the eco system, firstly finding the policy you want to review, followed by locating the audience id, and then reviewing the applicable content manually, and noting the catalogEntry id.
I wont walk through the whole process, as they are stepped out along the way of this article, but I will summarise the order below.
- Locate the Policy
- Locate the audience id
- Review the Applicable Content
- Note the catalogEntry id
Once you have done the above, you can compile another object as per below to approve the content, replacing the CatalogEntryID and UpdatePolicyID placeholders with the correct values.
Closing Thoughts
It has been a long time in the making, but gosh, its going to help so many organisations, and in the future it will be a must have implementation. But for now, lets feed back to the Microsoft Team and get this service in use to ensure we can build a brighter and better future for device management.
Time to sign off on this one now, We’ve covered a lot in this article, and there is surely more to come. I always love hearing from people, so please comment, share and feedback on the article :).