Deploy Windows Subsystem for Linux
What is the Windows Susbsystem for Linux?
As per the Microsoft Documentation, The Windows Subsystem for Linux (WSL) is a new Windows 10 feature that enables you to run native Linux command-line tools directly on Windows, alongside your traditional Windows desktop and modern store apps.
Now what does that mean? Can you run a full Linux setup in this way? Well the answer to that is NO unfortunately not. This tool is designed for developers and other users who use bash and other common Linux tools.
I won’t go on as all of the information about WSL is in the link on the Microsoft Documentation text above.
I will however provide the two scripts I use and wrote (nothing special just a couple of lines) for deployment and detection and demonstrate how to deploy with MEMCM.
Once the subsystem is installed it doesn’t mean that a Linux distribution is automatically installed. You can access these distributions via the Public Microsoft Store, however if you use this in an Enterprise and would like them added to your Enterprise Store you will need to contact your Store Admin. I will touch on how to add these just for simple convenience.
(Un)Installation Script
The script below can be used to both Enable and Disable the Windows Subsystem for Linux depending on what command line switch you specify. As mentioned this is not a complex script and it is easily edited for other Windows Optional Features
Detection Script
The script below can be for detection of the Windows Subsystem for Linux. I did try to use the Get-WindowsOptionalFeature -Online however it seemed to never be detected.
MEMCM Application
Head over to your Software Library and Start Creating an application in your desired folder
- General Tab – Select Manually Specify the application information
- General Information – Input your desired information, I called this Windows Subsystem for Linux but this is entirely your choice
- Software Center – Check the information and upload an icon if you would like, I used the below feel free to save it :D

- Deployment Types – Click Add
- Deployment Type – General – Change the Type to Script Installer
- Deployment Type – General Information – Provide a name and admin comments for your deployment type
- Deployment Type – Content
- Content Location – Select your content location (Where you saved the PowerShell Script)
- Installation Program – Powershell.exe -ExecutionPolicy Bypass -File “..ps1” -Enable
- Uninstall Program – Powershell.exe -ExecutionPolicy Bypass -File “..ps1” -Disable
- Deployment Type – Detection Method – Select Use custom script to detect the presence of this deployment type and click Edit
- Script Type – PowerShell
- Script Content – Use the detection method script above
- Deployment Type – User Experience
- Installation Behavior – Install for System (Leave the reset as default or change as you desire)
- Deployment Type – Requirements – Add any requirements you want it to meet (The application does not require anything to install)
- Deployment Type – Dependencies – Add any dependencies you want it to meet (The application does not require any to install)
Finish both of the off the dialog windows through the summary panes and then deploy the applications to your desired collections.
As mentioned above you will need to use a Linux distribution to use with the Windows Subsystem for Linux which are available in the Microsoft Store.
Intune Application
- Select Apps from the navigation pane
- Select All Apps, Click Add
- Select App type Other>Windows app (Win32), Click Select
- Click Select app package file, Click the Blue Folder icon to open the browse windows
- Select the .intunewin file you have created containing a copy of the script above, Click Open and then click OK
- Fill out the Name and Publisher mandatory fields, and any other fields you desire
- Upload an icon if you desire, I would recommend doing this if you are deploying this to users via the Company Portal
- Click Next
- Enter your install command powershell.exe -executionpolicy bypass “.<Script Name.ps1>” -Enable
- Enter your uninstall command powershell.exe -executionpolicy bypass “.<Script Name.ps1>” -Disable
- Select your install behavior as System
- Select your desired restart behavior, Adding custom return codes if required
- Click Next
- Complete your OS Requirements, At a minimum you need to specify the Architecture (x86/x64) and the minimum OS Version (e.g. 1607/1703 etc.)
- Click Next
- For Detection rules, select Use a custom detection script
- Script File: Browse to a copy of the Detection Script provided above.
- Assign the application to your desired group
- Click Create
Microsoft Store for Business
The Linux Distributions are available in the Microsoft Store for Business (MSfB), you and/or your company may restrict what apps can be installed from the store.
Below is a run down on how to deploy these Distros to Azure AD/Microsoft 365 Groups.
We will also look at how to deploy these in Offline mode.
- To get started launch the Microsoft Store for Business page.
Click Sign in in the top right-hand corner and complete the sign-in process - Type Linux in the search bar
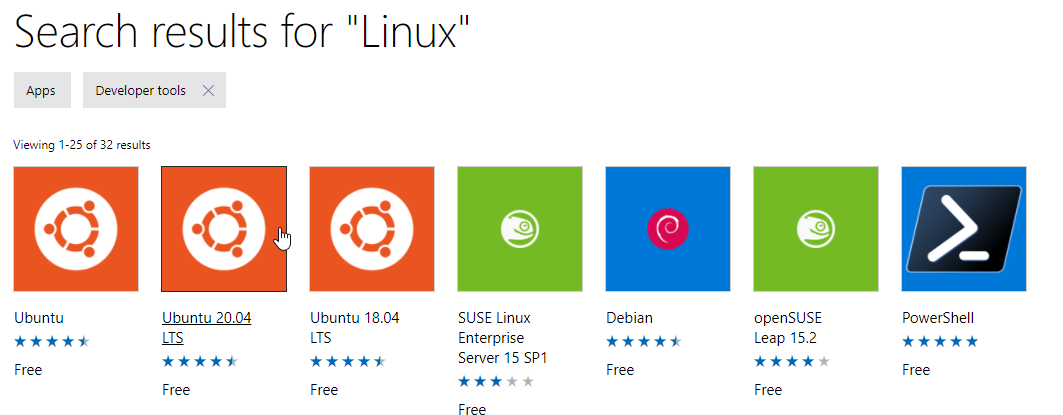
- Click on the Distro you would like to use/deploy
- Select you Licence Type, See Microsoft Documentation
- Click Get App.
- Select the drop down below for your method of distribution.
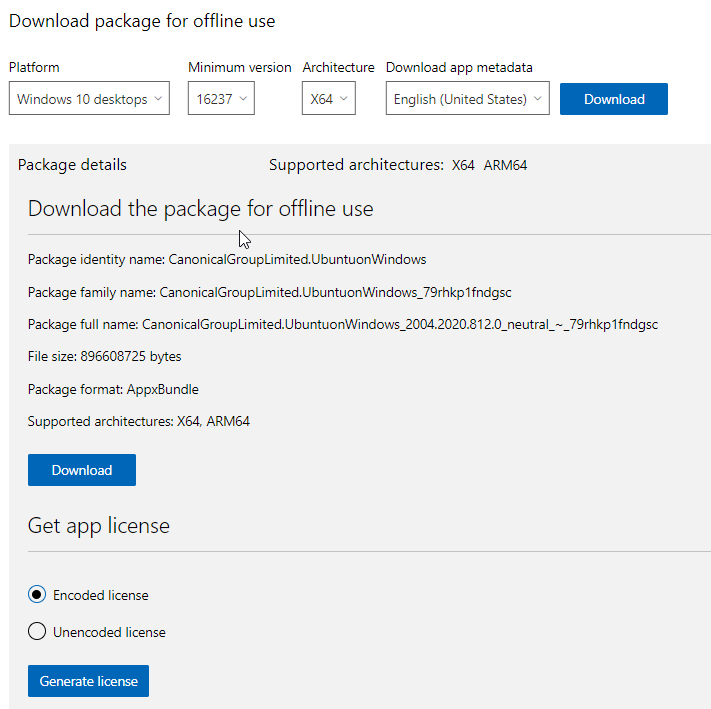
- Distribute the content using your preferred method
- The Distro will now appear in your Start Menu

Categories
Tags

Deploy Windows Subsystem for Linux
What is the Windows Susbsystem for Linux?
As per the Microsoft Documentation, The Windows Subsystem for Linux (WSL) is a new Windows 10 feature that enables you to run native Linux command-line tools directly on Windows, alongside your traditional Windows desktop and modern store apps.
Now what does that mean? Can you run a full Linux setup in this way? Well the answer to that is NO unfortunately not. This tool is designed for developers and other users who use bash and other common Linux tools.
I won’t go on as all of the information about WSL is in the link on the Microsoft Documentation text above.
I will however provide the two scripts I use and wrote (nothing special just a couple of lines) for deployment and detection and demonstrate how to deploy with MEMCM.
Once the subsystem is installed it doesn’t mean that a Linux distribution is automatically installed. You can access these distributions via the Public Microsoft Store, however if you use this in an Enterprise and would like them added to your Enterprise Store you will need to contact your Store Admin. I will touch on how to add these just for simple convenience.
(Un)Installation Script
The script below can be used to both Enable and Disable the Windows Subsystem for Linux depending on what command line switch you specify. As mentioned this is not a complex script and it is easily edited for other Windows Optional Features
Detection Script
The script below can be for detection of the Windows Subsystem for Linux. I did try to use the Get-WindowsOptionalFeature -Online however it seemed to never be detected.
MEMCM Application
Head over to your Software Library and Start Creating an application in your desired folder
- General Tab – Select Manually Specify the application information
- General Information – Input your desired information, I called this Windows Subsystem for Linux but this is entirely your choice
- Software Center – Check the information and upload an icon if you would like, I used the below feel free to save it :D
- Deployment Types – Click Add
- Deployment Type – General – Change the Type to Script Installer
- Deployment Type – General Information – Provide a name and admin comments for your deployment type
- Deployment Type – Content
- Content Location – Select your content location (Where you saved the PowerShell Script)
- Installation Program – Powershell.exe -ExecutionPolicy Bypass -File “..ps1” -Enable
- Uninstall Program – Powershell.exe -ExecutionPolicy Bypass -File “..ps1” -Disable
- Deployment Type – Detection Method – Select Use custom script to detect the presence of this deployment type and click Edit
- Script Type – PowerShell
- Script Content – Use the detection method script above
- Deployment Type – User Experience
- Installation Behavior – Install for System (Leave the reset as default or change as you desire)
- Deployment Type – Requirements – Add any requirements you want it to meet (The application does not require anything to install)
- Deployment Type – Dependencies – Add any dependencies you want it to meet (The application does not require any to install)
Finish both of the off the dialog windows through the summary panes and then deploy the applications to your desired collections.
As mentioned above you will need to use a Linux distribution to use with the Windows Subsystem for Linux which are available in the Microsoft Store.
Intune Application
- Select Apps from the navigation pane
- Select All Apps, Click Add
- Select App type Other>Windows app (Win32), Click Select
- Click Select app package file, Click the Blue Folder icon to open the browse windows
- Select the .intunewin file you have created containing a copy of the script above, Click Open and then click OK
- Fill out the Name and Publisher mandatory fields, and any other fields you desire
- Upload an icon if you desire, I would recommend doing this if you are deploying this to users via the Company Portal
- Click Next
- Enter your install command powershell.exe -executionpolicy bypass “.<Script Name.ps1>” -Enable
- Enter your uninstall command powershell.exe -executionpolicy bypass “.<Script Name.ps1>” -Disable
- Select your install behavior as System
- Select your desired restart behavior, Adding custom return codes if required
- Click Next
- Complete your OS Requirements, At a minimum you need to specify the Architecture (x86/x64) and the minimum OS Version (e.g. 1607/1703 etc.)
- Click Next
- For Detection rules, select Use a custom detection script
- Script File: Browse to a copy of the Detection Script provided above.
- Assign the application to your desired group
- Click Create
Microsoft Store for Business
The Linux Distributions are available in the Microsoft Store for Business (MSfB), you and/or your company may restrict what apps can be installed from the store.
Below is a run down on how to deploy these Distros to Azure AD/Microsoft 365 Groups.
We will also look at how to deploy these in Offline mode.
- To get started launch the Microsoft Store for Business page.
Click Sign in in the top right-hand corner and complete the sign-in process - Type Linux in the search bar
- Click on the Distro you would like to use/deploy
- Select you Licence Type, See Microsoft Documentation
- Click Get App.
- Select the drop down below for your method of distribution.
- Distribute the content using your preferred method
- The Distro will now appear in your Start Menu